Overview
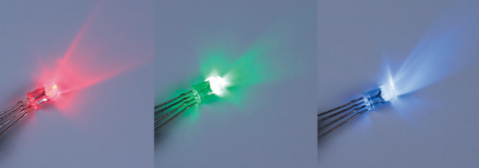
In this lesson, you will learn about how to use RGB LED. A RGB LED packages three LEDs in red, green and blue into one transparent or semitransparent plastic shell. It displays a broad array of colors by changing the input voltage of three pins and adding the three colors together in different ways. As is said in a statistic, RGB LED can create 16,777,216 different colors.
Components Required

Component Introduction
RGB LEDs can be categorized into common anode and common cathode ones. In this experiment, the latter is used. The common cathode, or CC, means to connect the cathodes of the three LEDs. After you connect it with GND and plug in the three pins, the LED will flash the corresponding color.
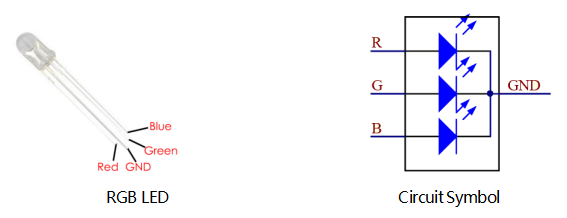
An RGB LED has 4 pins: the longest one is GND; the others are Red, Green and Blue. Touch its plastic shell and you will find a cut. The pin closest to the cut is the first pin, marked as Red, then GND, Green and Blue in turn.
Or you can distinguish them in another way. As GND is the longest one and can be defined directly, you just need to confirm the other three pins. You can test it by giving them a small voltage. The forward voltage drop from the three pins to the GND are respectively 1.8V (red), 2.5V (blue), and 2.3V (green). Thus, when you connect the same current limiting resistor with the three pins and supply them with the same voltage, the red one is the brightest, and then comes the green and the blue one. Therefore, you may need to add a current limiting resistor with different resistances to the three pins for these colors.
Fritzing Circuit
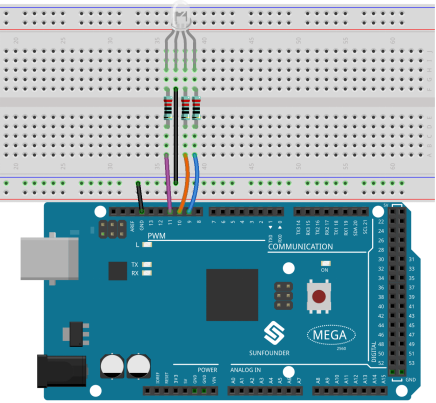
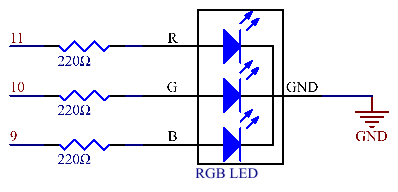
Here we input a value between 0 and 255 to the three pins of the RGB LED to make it display different colors. After connecting the pins of R, G, and B to a current limiting resistor, connect them to the pin 9, pin 10, and pin 11 respectively. The longest pin (GND) of the LED connects to the GND of the Mega 2560. When the three pins are given different PWM values, the RGB LED will display different colors.
Schematic Diagram
Code
NOTE: A small portion of the codes are omitted. Please check the complete codes (sunfounder_vincent_kit_for_arduino\code\2.3rgbLed\2.3rgbLed.ino) in Arduino IDE.
const int redPin = 11;
const int greenPin = 10;
const int bluePin = 9;

void setup()
{
  pinMode(redPin, OUTPUT);    // sets the redPin to be an output
  pinMode(greenPin, OUTPUT);  // sets the greenPin to be an output
  pinMode(bluePin, OUTPUT);   // sets the bluePin to be an output
}

void loop()                   // run over and over again
{
  color(255, 0, 0);           // turn the RGB LED red
  delay(1000);                // delay for 1 second
  color(0,255, 0);            // turn the RGB LED green
  delay(1000);                // delay for 1 second
  color(0, 0, 255);           // turn the RGB LED blue
  delay(1000);                // delay for 1 second
  // ...
}

void color (unsigned char red, unsigned char green, unsigned char blue)// the color generating function
{
  analogWrite(redPin, red);
  analogWrite(greenPin, green);
  analogWrite(bluePin, blue);
}
Uploaded the codes into the Mega2560 board, you can see that the color of the RGB LED changes once a second.
Code Analysis
In this example, the function used to assign values to the three pins of RGB is packaged in an independent subfunction color().
void color (unsigned char red, unsigned char green, unsigned char blue)// the color generating function
{
  analogWrite(redPin, red);
  analogWrite(greenPin, green);
  analogWrite(bluePin, blue);
}
In loop(), RGB value works as an input argument to call the function color() to realize that the RGB can emit different colors.
void loop()         // run over and over again
{
  color(255, 0, 0); // turn the RGB LED red
  delay(1000);      // delay for 1 second
  color(0,255, 0);  // turn the RGB LED green
  delay(1000);      // delay for 1 second
  color(0, 0, 255); // turn the RGB LED blue
  delay(1000);      // delay for 1 second
  // ...
}
Phenomenon Picture