Introduction
A 7-segment display is a device made up of seven LEDs connected in parallel that can be used for displaying numerals and some letters. Different letters/numbers can be represented by connecting different pins on the display to the power source, thus turning on the LEDs in parallel. In this lesson you will learn how to use such a display to display characters.
Components
– 1 * SunFounder Uno board
– 1 * 7-segment display (Common Cathode)
– 8 * Resistor (220Ω)
– 1 * USB cable
– Jumper wires
– 1 * Breadboard
Principle
The 7-segment display consists of seven LEDs arranged in a rectangular fashion. Each of the seven LEDs is called a segment because when illuminated the segment forms part of a numerical digit (both Decimal and Hex) to be displayed. An additional 8th LED is sometimes used within the same package thus allowing the indication of a decimal point (DP) when two or more 7-segment displays are connected together to display numbers greater than ten.
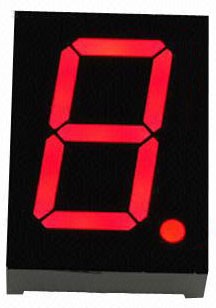
Each one of the seven LEDs in the display is given a positional segment with one of its connection pins being brought straight out of the rectangular plastic package. These LED pins are labeled from a through to g representing each individual LED. The other LED pins are connected together and wired to form a common pin.
So by forward biasing the appropriate pins of the LED segments in a particular order, some segments will be light and others will be dark allowing the desired character pattern of the number to be generated on the display. This then allows us to display each of the ten decimal digits 0 through to 9 on the same 7-segment display.
The display’s common pin is generally used to identify which type of 7-segment display it is. As each LED has two connecting pins, one called the “Anode” and the other “Cathode”, there are therefore two types of LED 7-segment display called: Common Cathode (CC) and Common Anode (CA).
The difference between the two displays, as their name suggests, is that the common cathode has all the cathodes of the 7-segments connected directly together and the common anode has all the anodes of the 7-segments connected together.
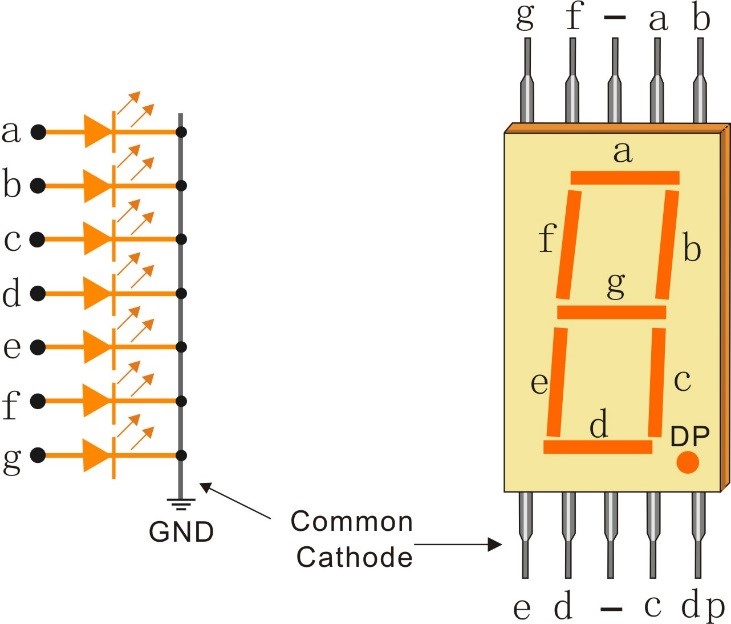
The Common Cathode (CC) – In the common cathode display, all the cathode connections of the LED segments are joined together to logic “0” or ground. The individual segments are illuminated by application of a “HIGH”, or logic “1” signal via a current limiting resistor to forward bias the individual Anode terminals (a-g).
Common Cathode 7-Segment Display
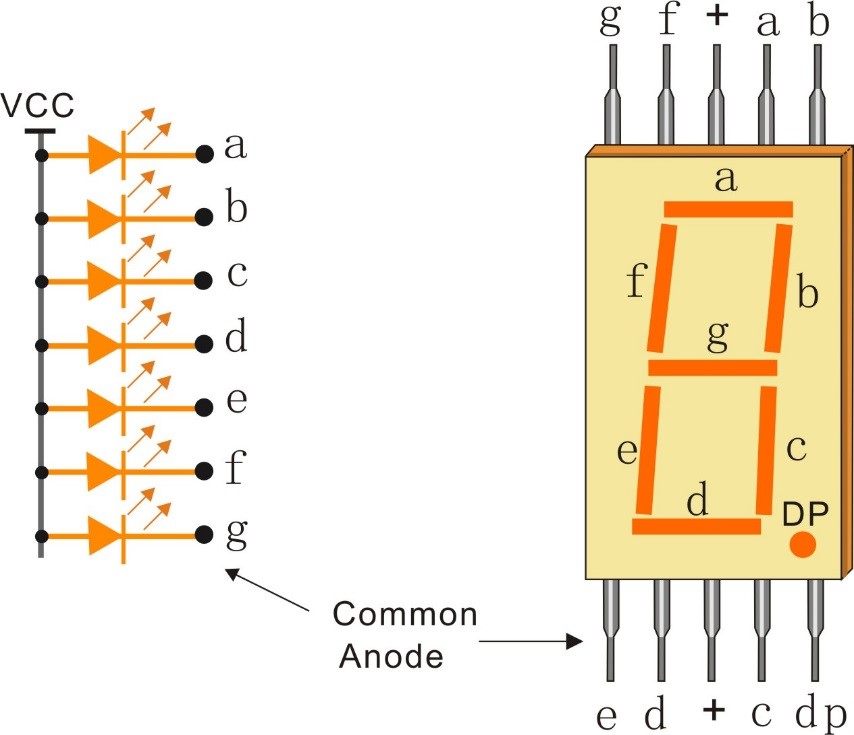
The Common Anode (CA) – In the common anode display, all the anode connections of the LED segments are joined together to logic “1”. The individual segments are illuminated by applying a ground, logic “0” or “LOW” signal via a suitable current limiting resistor to the Cathode of the particular segment (a-g).
Common Anode 7-Segment Display
Experimental Procedures
Step 1: Build the circuit
The wiring between the 7-segment display and the SunFounder Uno board is as shown below:
| 7-Segment Display | SunFounder Uno Board |
| a | 7 |
| b | 6 |
| c | 5 |
| d | 11 |
| e | 10 |
| f | 8 |
| g | 9 |
| dp | 4 |
| “-” | GND |
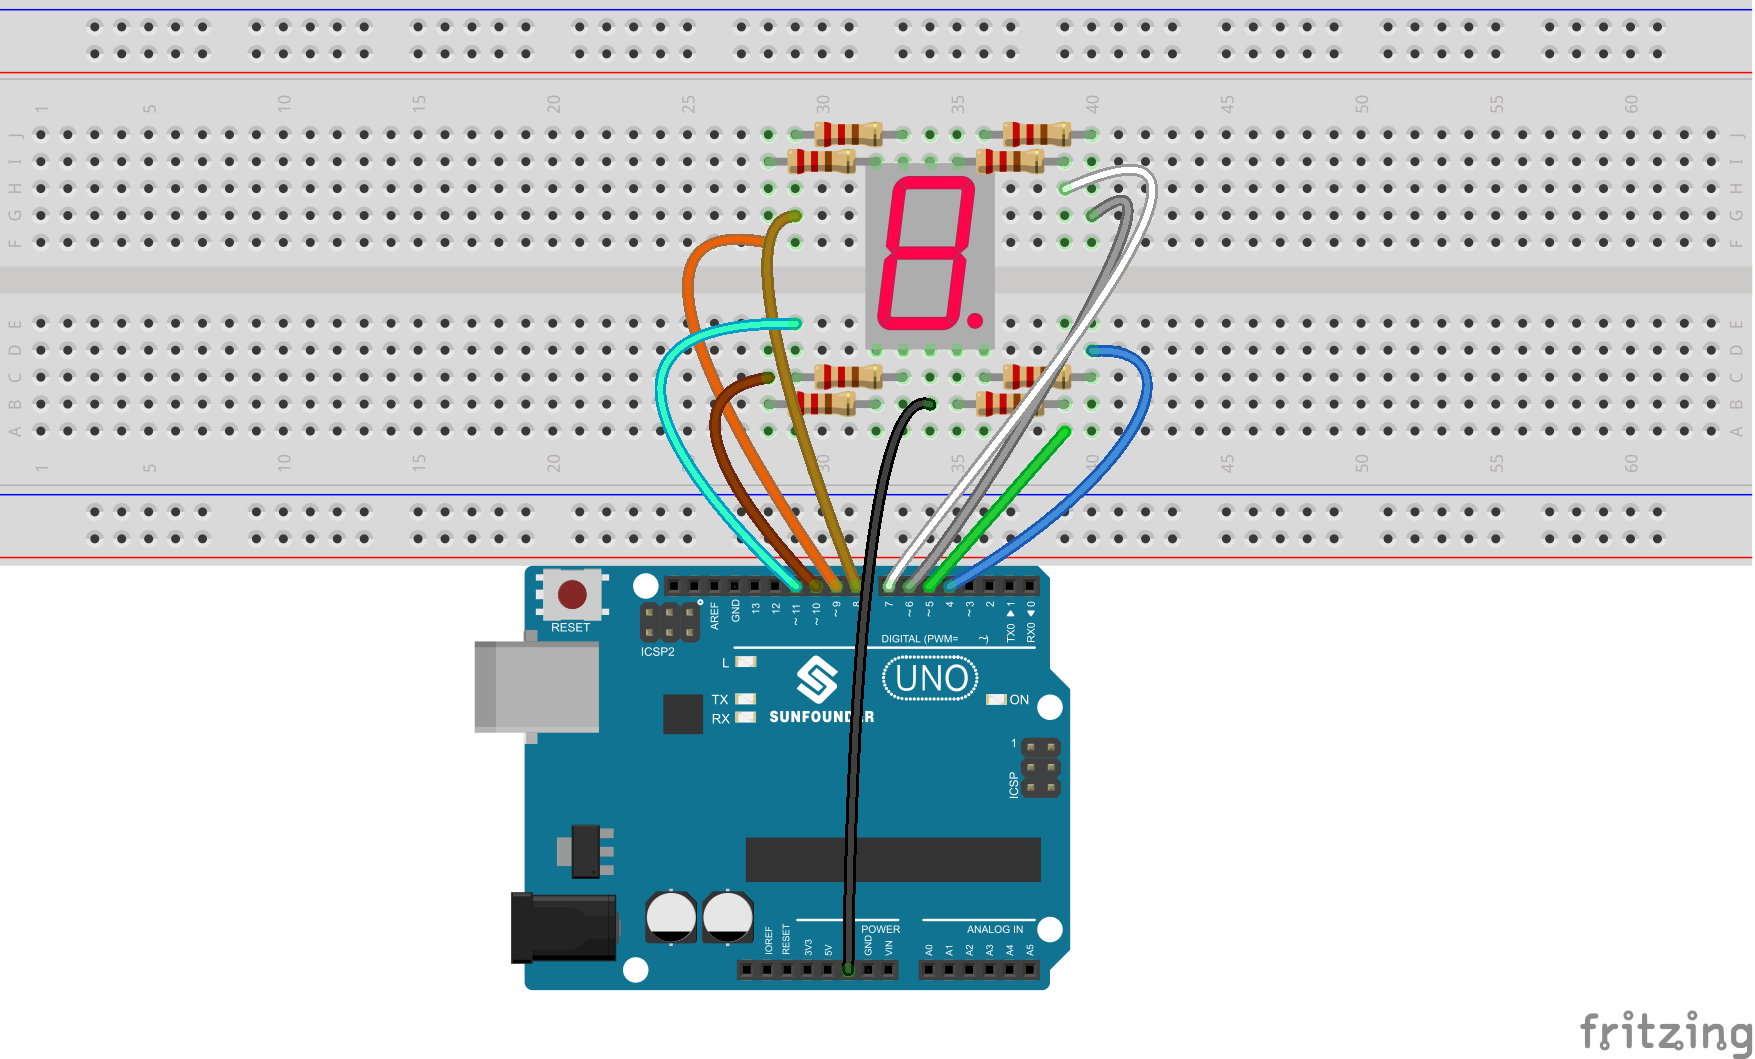
The schematic diagram
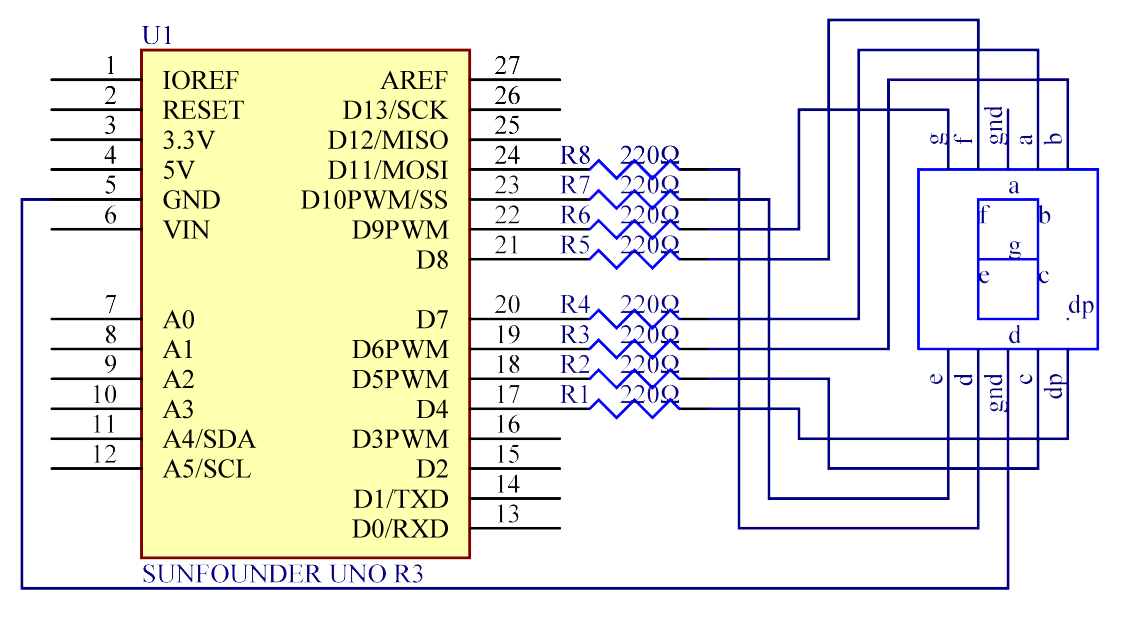
Step 2: Program (Please refer to the example code in LEARN -> Get Tutorial on our website)
Step 3: Compile the code
Step 4: Upload the sketch to the SunFounder Uno board
You should now see the 7-segment display from 0 to 9 and then A to F, back and forth.
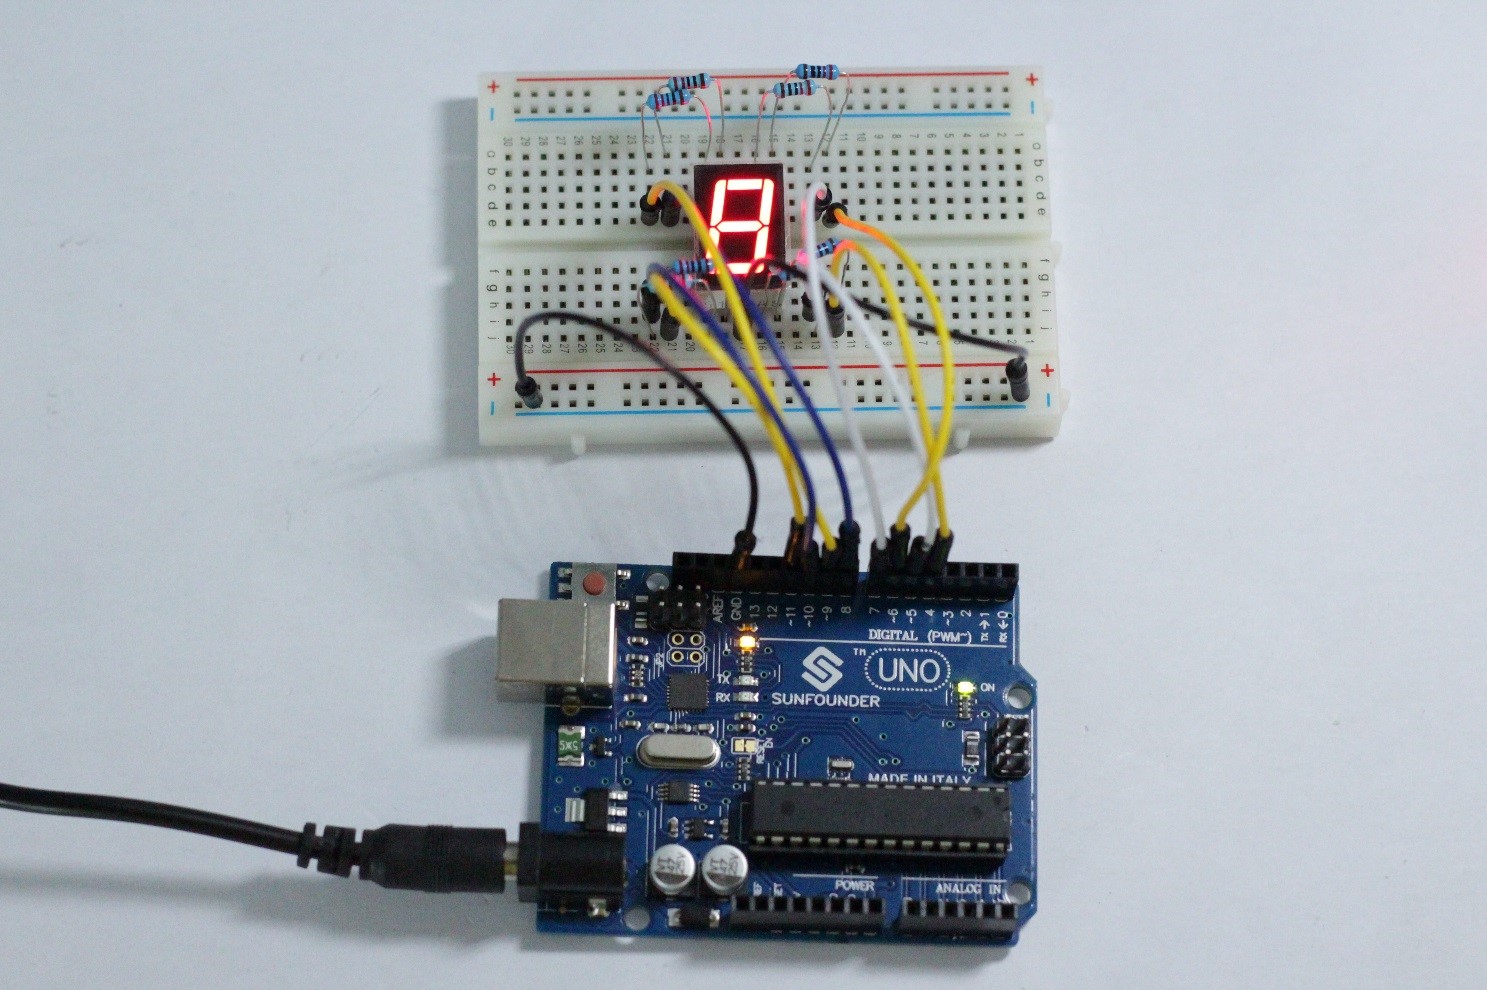
Code
| //7-Segment Display//You should now see the 7-segment display cycle from 0 to F //Email:support@sunfounder.com //Website:www.sunfounder.com //2015.5.7 const int a=7; //a of 7-segment attach to digital pin 7 const int b=6; //b of 7-segment attach to digital pin 6 const int c=5; //c of 7-segment attach to digital pin 5 const int d=11;//d of 7-segment attach to digital pin 11 const int e=10;//e of 7-segment attach to digital pin 10 const int f=8;//f of 7-segment attach to digital pin 8 const int g=9;//g of 7-segment attach to digital pin 9 const int dp=4;//dp of 7-segment attach to digital pin 4 void setup() { //loop over thisPin from 4 to 11 and set them all to output for(int thisPin = 4;thisPin <= 11;thisPin++) { pinMode(thisPin,OUTPUT); } digitalWrite(dp,LOW);//turn the dp of the 7-segment off } void loop() { digital_1();//diaplay 1 to the 7-segment delay(1000);//wait for a second digital_2();//diaplay 2 to the 7-segment delay(1000); //wait for a second digital_3();//diaplay 3 to the 7-segment delay(1000); //wait for a second digital_4();//diaplay 4 to the 7-segment delay(1000); //wait for a second digital_5();//diaplay 5 to the 7-segment delay(1000); //wait for a second digital_6();//diaplay 6 to the 7-segment delay(1000); //wait for a second digital_7();//diaplay 7 to the 7-segment delay(1000); //wait for a second digital_8();//diaplay 8 to the 7-segment delay(1000); //wait for a second digital_9();//diaplay 8 to the 7-segment delay(1000); //wait for a second digital_A();//diaplay 8 to the 7-segment delay(1000); //wait for a second digital_b();//diaplay 8 to the 7-segment delay(1000); //wait for a second digital_C();//diaplay 8 to the 7-segment delay(1000); //wait for a second digital_d();//diaplay 8 to the 7-segment delay(1000); //wait for a second digital_E();//diaplay 8 to the 7-segment delay(1000); //wait for a second digital_F();//diaplay 8 to the 7-segment delay(1000); //wait for a second } void digital_1(void) //diaplay 1 to the 7-segment { digitalWrite(c,HIGH);//turn the c of the 7-segment on digitalWrite(b,HIGH);//turn the b of the 7-segment on for(int j = 7;j <= 11;j++)//turn off the others { digitalWrite(j,LOW); } } void digital_2(void) //diaplay 2 to the 7-segment { digitalWrite(b,HIGH); digitalWrite(a,HIGH); for(int j = 9;j <= 11;j++) digitalWrite(j,HIGH); digitalWrite(c,LOW); digitalWrite(f,LOW); } void digital_3(void) //diaplay 3 to the 7-segment { unsigned char j; digitalWrite(g,HIGH); digitalWrite(d,HIGH); for(j=5;j<=7;j++) digitalWrite(j,HIGH); digitalWrite(f,LOW); digitalWrite(e,LOW); } void digital_4(void) //diaplay 4 to the 7-segment { digitalWrite(c,HIGH); digitalWrite(b,HIGH); digitalWrite(f,HIGH); digitalWrite(g,HIGH); digitalWrite(a,LOW); digitalWrite(e,LOW); digitalWrite(d,LOW); } void digital_5(void) //diaplay 5 to the 7-segment { unsigned char j; for(j = 7;j <= 9;j++) digitalWrite(j,HIGH); digitalWrite(c,HIGH); digitalWrite(d,HIGH); digitalWrite(b,LOW); digitalWrite(e,LOW); } void digital_6(void) //diaplay 6 to the 7-segment { unsigned char j; for(j = 7;j <= 11;j++) digitalWrite(j,HIGH); digitalWrite(c,HIGH); digitalWrite(b,LOW); } void digital_7(void) //diaplay 7 to the 7-segment { unsigned char j; for(j = 5;j <= 7;j++) digitalWrite(j,HIGH); for(j = 8;j <= 11;j++) digitalWrite(j,LOW); } void digital_8(void) //diaplay 8 to the 7-segment { unsigned char j; for(j = 5;j <=11;j++) digitalWrite(j,HIGH); } void digital_9(void) //diaplay 9 to the 7-segment { unsigned char j; for(j = 5;j <=9;j++) digitalWrite(j,HIGH); digitalWrite(d,LOW); digitalWrite(e,LOW); } void digital_A(void) //diaplay A to the 7-segment { unsigned char j; for(j = 5;j <=10;j++) digitalWrite(j,HIGH); digitalWrite(d,LOW); } void digital_b(void) //diaplay b to the 7-segment { unsigned char j; for(j = 7;j <=11;j++) digitalWrite(j,HIGH); digitalWrite(a,LOW); digitalWrite(b,LOW); } void digital_C(void) //diaplay C to the 7-segment { digitalWrite(a,HIGH); digitalWrite(b,LOW); digitalWrite(c,LOW); digitalWrite(d,HIGH); digitalWrite(e,HIGH); digitalWrite(f,HIGH); digitalWrite(g,LOW); } void digital_d(void) //diaplay d to the 7-segment { unsigned char j; digitalWrite(a,LOW); digitalWrite(f,LOW); digitalWrite(b,HIGH); digitalWrite(c,HIGH); digitalWrite(j,HIGH); for(j = 9;j <=11;j++) digitalWrite(j,HIGH); } void digital_E(void) //diaplay E to the 7-segment { unsigned char j; digitalWrite(b,LOW); digitalWrite(c,LOW); for(j = 7;j <=11;j++) digitalWrite(j,HIGH); } void digital_F(void) //diaplay F to the 7-segment { unsigned char j; digitalWrite(b,LOW); digitalWrite(c,LOW); digitalWrite(d,LOW); for(j = 7;j <=10;j++) digitalWrite(j,HIGH); } |
Video
