2.1Acrylic Plates
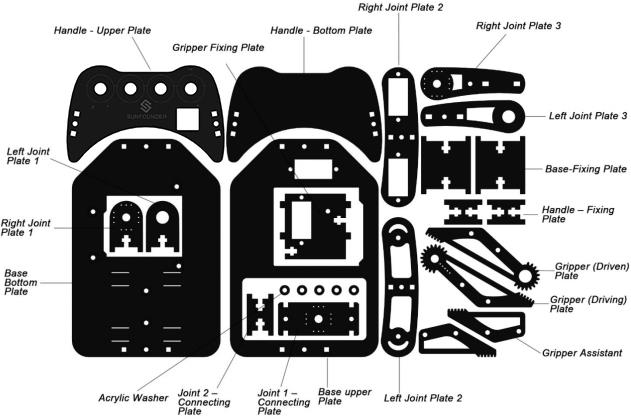 |
Prior to assembling the Rollarm, you need to remove the residues in the holes of the plates and the stickers on the plates. Here we take the Joint 1 fixing plate for example.
| 1. Check whether there are some residues in the holes of the acrylic plate. | 2. Use a tool with a pointed end to remove the residue. |
| 3. Make sure that all the residues are cleared. | 4. Use the pointed tool to scratch off the sticker on the plate. |
2.2 Connecting Components
| Name | Component | Qty. |
| M1.2*4 Self-Tapping Screw | 14 | |
| M2*8 Screw | 8 | |
| M2 Nut | 8 | |
| M3*8 Flat-Head Screw | 2 | |
| M3*8 Flat-Head Screw | 10 | |
| M3*10 Screw | 18 | |
| M3 Nut | 20 | |
| M7 Thin Nut | 4 | |
| M3*10*1 Washer | 1 | |
| M3*10 Aluminum Tube | 5 | |
| M3*6 Corn Rivet | 2 | |
| φ3*φ8*4 Band Edge Bearing | 3 |
2.3 Electronic Components
| SunFounderServo (9g) | 4 | |
| Potentiometer Button | 4 | |
| Button | 1 | |
| 2*18650 Battery Holder | 1 | |
| SunFounder Mars Board | 1 | |
| Extension Board | 1 | |
| SunFounder Potentiometer Module | 1 | |
| USB Type-C Cable | 1 | |
| RJ11 Cable | 2 | |
| Riband (50cm) | 1 | |
| 3M Non-skid Pad | 4 | |
| Cable Spiral Wrap | 2 | |
| Cable Clip | 2 |
2.4 Tools
| Screw Driver | 1 |
2.5 Self-Provided Components
| 18650 Battery | 2 |