In this chapter, configure your Raspberry Pi first.
For the Raspberry Pi OS (previously called Raspbian) system, You are recommend to install the version: Raspberry Pi OS (32-bit) with desktop and recommended software.
If you have installed the other two versions, you need to install the following softwares manually and then skip this chapter.
sudo apt-get update
sudo apt-get install git-core
sudo apt-get install python3-pip
sudo pip3 install setuptools
If you are a beginner, please follow this chapter to let your Raspberry Pi work.
Depending on the different devices you use, you can start up the Raspberry Pi in different methods. If you have a separate screen for Raspberry Pi, follow the instructions eariler in this chapter. Otherwise, please find the corresponding steps in later parts of this chapter.
If You Have a Screen
If you have a screen, you can use the NOOBS to install the Raspberry Pi OS system.
Required Components
| Any Raspberry Pi | 1 * RPi Power Adapter |
| 1 * Monitor | 1 * Monitor Power Adapter |
| 1 * HDMI cable | 1 * Micro SD card |
| 1 * Mouse | 1 * Keyboard |
| 1 * Personal Computer |
Procedures
Step 1: To download NOOBS from your PC, you can choose NOOBS or NOOBS LITE – the only difference is that there is a built-in offline Raspberry Pi OS installer in NOOBS, while the NOOBS LITE can only be operated online. Here, you are suggested to use the former. Here is the download address of Noobs: https://www.raspberrypi.org/downloads/noobs/

Step 2: Plug in the Micro SD reader and format the Micro SD card with the SD Formatter (https://www.sdcard.org/downloads/formatter/index.html). If there are some important files in the Micro SD card, please backup them first.
Step 3: Next, you will need to extract the files from the NOOBS zip archive you downloaded from the Raspberry Pi website.
- Find the downloaded archive — by default, it should be in your Downloads folder.
- Double-click on it to extract the files, and keep the resulting Explorer/Finder window open.
Finally select all the files in the NOOBS folder and copy them to the Micro SD card.

Step 4: All the files transferred, the Micro SD card pops up.
Step 5: Insert the Micro SD card into the Raspberry Pi. In addition, connect the screen, keyboard and mouse to it. Finally plug a power adapter into the Raspberry Pi.
Step 6: It will go to the NOOBS interface after starting up. If you use NOOBS LITE, you need to select Wi-Fi networks (w) first. Tick the checkbox of the Raspbian and click Install in the top left corner. The NOOBS will help to conduct the installation automatically. This process will take a few minutes.
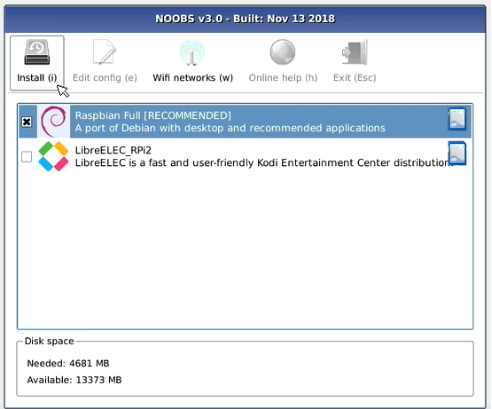
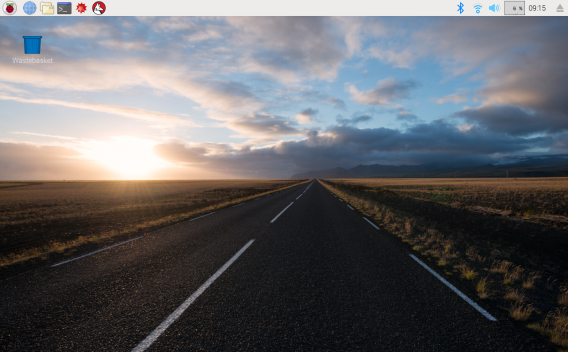
Step 7: When the installation is done, the system will restart automatically and the desktop of the system will appear.
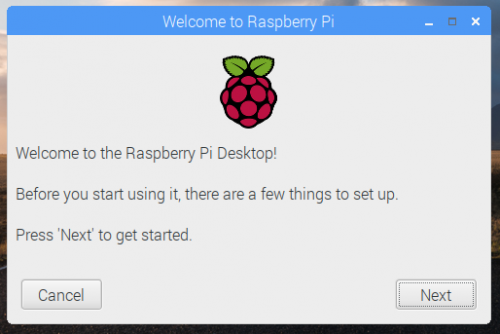
Step 8: If you run Raspberry Pi for the first time, the application of “Welcome to Raspberry Pi” pops up and guides you to perform the initial setup.
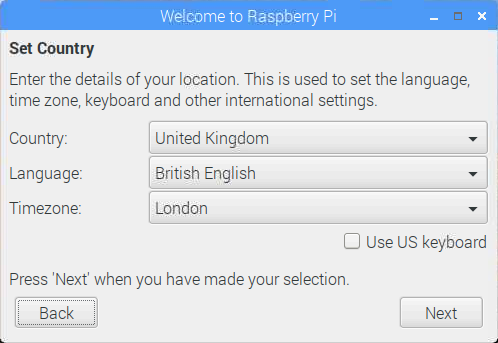
Step 9: Set country/region, language and time zone, and then click“next”again.
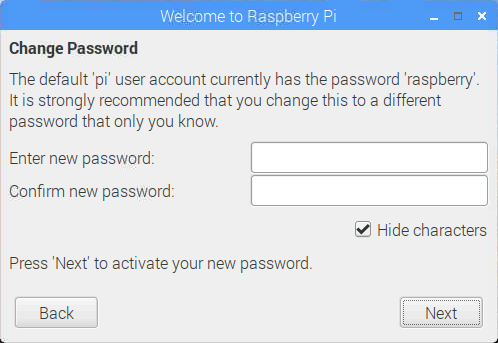
Step 10: Input the new password of Raspberry Pi and click“Next”.
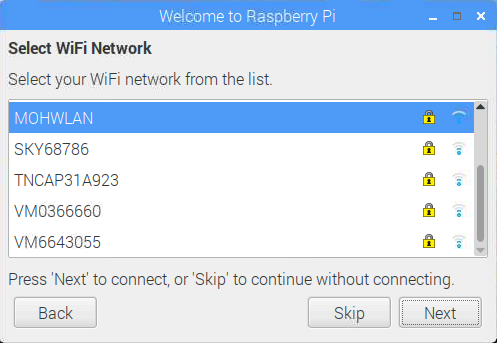
Step 11: Connect the Raspberry Pi to WIFI and click “Next”.
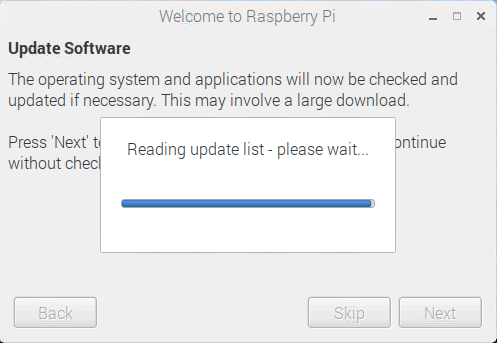
Step 12: Retrieve update.
Step 13: Click “Done” to complete the Settings.
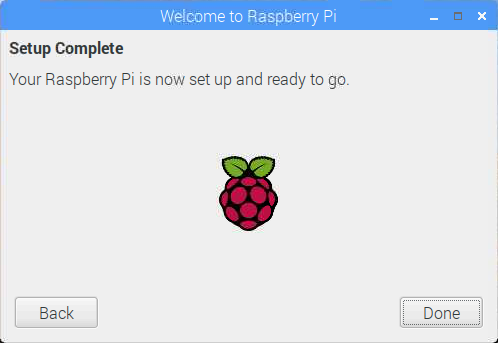
Now we can run the Raspberry Pi.
Note: You can check the complete tutorial of NOOBS on the official website of the Raspberry Pi: https://www.raspberrypi.org/help/noobs-setup/.
If You Have No Screen
If we don’t have a screen, we can directly write the Raspberry Pi OS system to the Micro SD card and we can control the Raspberry Pi on PC remotely by directly modifying the configuration file of the network settings in the Micro SD card.
Required Components
| Any Raspberry Pi | 1 * Power Adapter |
| 1 * Micro SD card | 1 * Personal computer |
Installing System
There are 2 ways to install the system, Using Raspberry Pi Imager or Using Raspberry Pi OS. Using Raspberry Pi Imager is a kind of method recommended by Raspberry Pi official website for beginners with which you can directly write the Raspberry Pi OS into SD card after downloading Raspberry Pi Imager. However, each time the system is reinstalled, this method can take several hours.
In the later method, you need to download Raspberry Pi OS image at first, then use the tool to write it to your SD card, which can be confusing. But once you successfully finish the flashing at the first time, it only takes about 10 minutes to flash again.
- Using Raspberry Pi Imager
Raspberry Pi have developed a graphical SD card writing tool that works on Mac OS, Ubuntu 18.04 and Windows, and is the easiest option for most users as it will download the image and install it automatically to the SD card.
- Download the latest version of Raspberry Pi Imager(https://www.raspberrypi.org/downloads/) and install it.
- Connect an SD card reader with the SD card inside.
- Open Raspberry Pi Imager and choose Raspberry Pi OS (other) -> Raspberry Pi OS Full (32-bit).
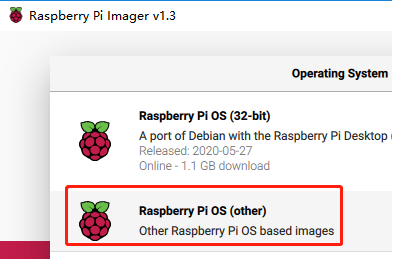
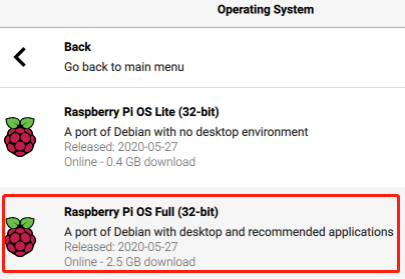
- Choose the SD card you wish to write your image to.
- Review your selections and click ‘WRITE’ to begin writing data to the SD card.
Note: If using the Raspberry Pi Imager on Windows 10 with Controlled Folder Access enabled, you will need to explicitly allow the Raspberry Pi Imager permission to write the SD card. If this is not done, Raspberry Pi Imager will fail with a “failed to write” error.
- Using Raspberry Pi OS
Step 1: Prepare the tool of image burning. Here we use the balenaEtcher. You can download the software from the link: https://www.balena.io/etcher/
Step 2: Download the complete image on the official website by clicking this link: https://www.raspberrypi.org/downloads/raspbian/. There are three different kinds of Raspberry Pi OS system available, You are recommend to install the version:Raspberry Pi OS with desktop and recommended software.
Step 3: Unzip the package downloaded and you will see the .img file inside.
Note: The Raspberry Pi OS with desktop image contained in the ZIP archive is over 4GB in size and uses the ZIP64 format. To uncompress the archive, a unzip tool that supports ZIP64 is required. The following zip tools support ZIP64: 7-Zip (Windows), The Unarchiver (Mac) and Unzip (Linux).
Step 4: Plug the USB card reader into the computer, then you can burn the .img file with the Etcher.
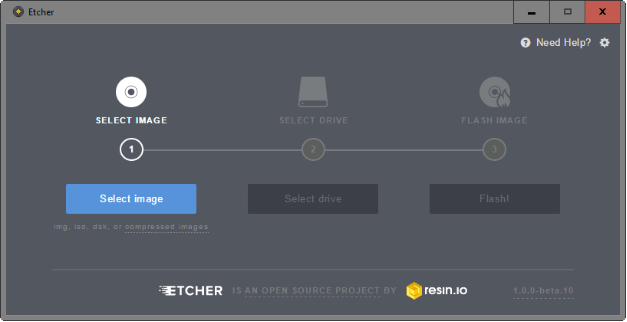
At this point, Raspberry Pi OS is installed. Keep the USB card reader plug in your computer. If you want to apply it, next you need to complete the settings accordingly.
Connect the Raspberry Pi to the Internet
There are two methods to help get the Raspberry Pi connected to the network: the first one is using a network cable, the other way is using WIFI. We will talk in detail about how to connect via WIFI as below.
If you want to use the WIFI function, you need to modify a WIFI configuration file wpa-supplicant.conf in the Micro SD card by your PC that is located in the directory /etc/wpa_supplicant/.
If your personal computer is working on a linux system, you can access the directory directly to modify the configuration file; however, if your PC use Windows system, then you can’t access the directory and what you need next is to go to the directory, /boot/ to create a new file with the same name, wpa_supplicant. conf.

Input the following content in the file.
ctrl_interface=DIR=/var/run/wpa_supplicant GROUP=netdev
update_config=1
country=GB
network=
{
  ssid="WiFi-A"
  psk="Sunfounder"
  key_mgmt=WPA-PSK
  priority=1
}
You need to replace “WiFi-A” with your custom name of WiFi and “Sunfounder” with your password. By doing these, the Raspberry Pi OS system will move this file to the target directory automatically to overwrite the original WIFI configuration file when it runs next time. After doing this step, you also need to keep the USB card reader plug in your computer.
Start SSH
To use the function of remote control of the Raspberry Pi, you need to start SSH firstly that is a more reliable protocol providing security for remote login sessions and other network services. Generally, SSH of Raspberry Pi is in a disabled state. Additionally, if you want to run it, you need to create a file named SSH under directory /boot/.

Now, the Raspberry Pi OS system is configured.
Power on the Raspberry Pi
Plug out the USB card reader and then plug the Micro SD card into the Raspberry Pi. Finally plug a power adapter into the Raspberry Pi.
Get the IP Address
Here, we need to get the IP address of it. There are many ways to know the IP address, and two of them are listed as follows.
1. Checking via the router
If you have permission to log in the router(such as a home network), you can check the addresses assigned to Raspberry Pi on the admin interface of router.
The default hostname of the system, Raspberry Pi OS is raspberrypi, and you need to find it. (If you are using ArchLinuxARM system, please find alarmpi.)
2. Network Segment Scanning
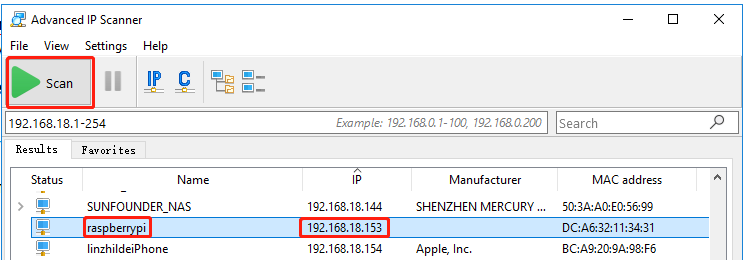
You can also use network scanning to look up the IP address of Raspberry Pi. You can apply the software, Advanced IP scanner(download from Google).
Click Scan and the name of all connected devices will be displayed. Similarly, the default hostname of the Raspberry Pi OS system is raspberrypi, now you need to find the hostname and its IP.
Use the SSH Remote Control
We can open the Bash Shell of Raspberry Pi by applying SSH. Bash is the standard default shell of Linux. The Shell itself is a program written in C that is the bridge linking the customers and Unix/Linux. Moreover, it can help to complete most of the work needed.
- For Linux or/Mac OS X Users
Step 1: Go to Applications->Utilities, find the Terminal, and open it.
Step 2: Type in ssh pi@ip_address . “pi”is your username and “ip_address” is your IP address. For example:
ssh pi@192.168.18.197Step 3: Input”yes”.
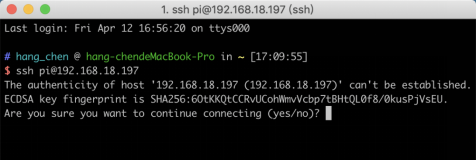
Step 4: Input the passcode and the default password is raspberry.

Step 5: We now get the Raspberry Pi connected and are ready to go to the next step.

Note: When you input the password, the characters do not display on window accordingly, which is normal. What you need is to input the correct passcode.
- For Windows Users
If you’re a Windows user, you can use SSH with the application of some software. Here, we recommend PuTTY.
Step 1: Download PuTTY. Open PuTTY and click Session on the left tree-alike structure. Enter the IP address of the RPi in the text box under Host Name (or IP address) and 22 under Port (by default it is 22).
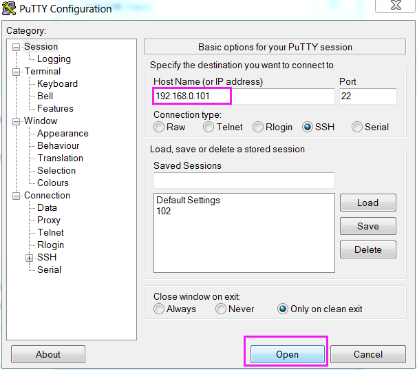
Step 2: Click Open. Note that when you first log in to the Raspberry Pi with the IP address, there prompts a security reminder. Just click Yes.
Step 3: When the PuTTY window prompts “login as:”, type in “pi”(the user name of the RPi), and password: “raspberry” (the default one, if you haven’t changed it).

Step 4: Here, we get the Raspberry Pi connected and it is time to conduct the next steps.
Note: When you input the password, the characters do not display on window accordingly, which is normal. What you need is to input the correct password.
