Introduction
In this lesson, we will learn how to program your Raspberry Pi to make an LED blink. You can play numerous tricks with an LED as long as your imagination is rich enough. Now follow me to learn, and you will enjoy the fun of DIY at once.
Experimental Conditions
– 1*Raspberry Pi
– 1*Breadboard
– 1*Network cable (or USB wireless network adapter)
– 1*LED
– 1*Resistor (220Ω)
– Jumper wires
Experimental Principle
Semiconductor light-emitting diode is a type of component which can turn electric energy into light energy via PN junctions. According to its wavelength, semiconductor light-emitting diode can be categorized into laser diode, infrared light-emitting diode and visible light-emitting diode which, called light-emitting diode for short, is usually known as LED.
When we supply 2V-3V forward voltage to an LED, it will blink if only forward currents flow through the LED. Usually we have red, yellow, green, blue and color-changing LED which can change its colors with different voltages. LEDs are widely used due to its low operating voltage, low current, luminescent stability and small size.
LEDs are diodes too. Hence they have a voltage drop which usually varies between 1V-3V depending on their types. Likewise, LEDs usually can emit light if supplied 5mA-30mA current, and generally we use 10mA-20mA. So when an LED is used, it is necessary to connect a current-limiting resistor to protect the LED from over-burning.

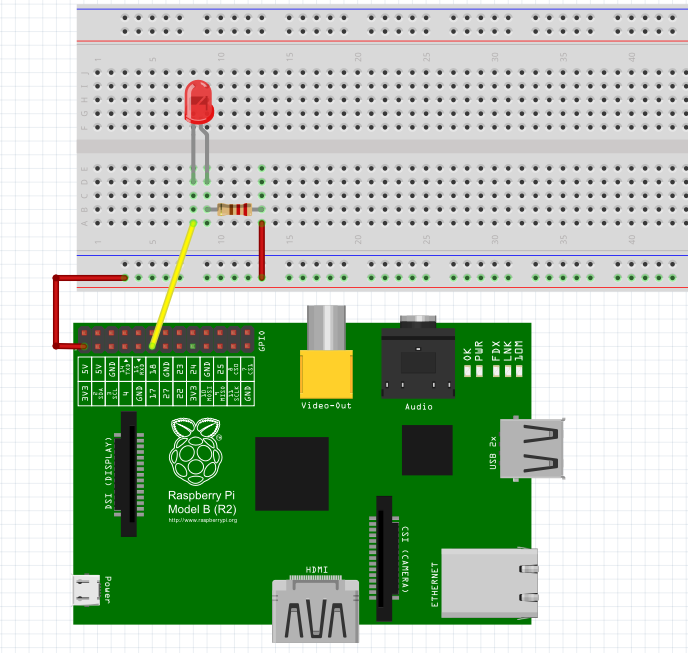
In this experiment, we will connect a 220Ω resistor to the positive pole of the LED and then connect it to 3.3 V power source, and connect the negative pole of LED to GPIO0 (See the Raspberry Pi pins distribution diagram and the above picture). If we write 1 to GPIO0, the voltage of the pin is 3.3V and the LED will not blink; if we write 0 to GIIO0, the output voltage is 0, then the LED will light up according to the above principle.
Experimental Procedure
Step1: Connect the circuit as shown in the following diagram
Step 2: Edit and save the code with vim (see path/Rpi_LcdStartKit/01_blinkingLed/led.c)
Step 3: Compile the code
| gcc led.c -lwiringPi |
Step 4: Run the program
| ./a.out |
Now, you can see your LED blinking.

Further Exploration
If you want the LED to blink faster, just change the delay time. For example, change the time to delay (200), recompile the program, and then run the program, you will see the LED blinking faster.
Summary
Raspberry Pi packages many underlying detail designs, which enable us to explore our own apps more conveniently. Maybe that is the most attractive place of Raspberry Pi.
Now you have already basically mastered the basic operation and application of Raspberry Pi GPIOs (General Purpose Input/Output). I hope you can try harder and continue to learn the next contents.
Code
| #include <wiringPi.h> #include <stdio.h> #define LedPin 0 int main(void) { if(wiringPiSetup() == -1){ //when initialize wiring failed,print messageto screen printf(“setup wiringPi failed !”); return 1; } printf(“linker LedPin : GPIO %d(wiringPi pin)\n”,LedPin); //when initialize wiring successfully,print message to screen pinMode(LedPin, OUTPUT); while(1){ digitalWrite(LedPin, LOW); //led on delay(500); digitalWrite(LedPin, HIGH); //led off delay(500); } return 0; } |