Introduction
In this lesson, we will use a 4-digit 7-segment display to make a stopwatch.
Components
– 1 * SunFounder Uno board
– 1 * USB data cable
– 1 * 4-Digit 7-Segment Display
– Several jumper wires
– 1 * Breadboard
– 8 * Resister (220Ω)
Experimental Principle
When a 7-segment display is used, if it is a common anode display, connect the anode pin to power source; if it is a common cathode one, connect the cathode pin to GND. When a 4-digit 7-segment display is used, the common anode or common cathode pin is to control the digit displayed. There is only one digit working. However, based on the principle of Persistence of Vision, we can see four 7-segment displays all displaying numbers. This is because the electronic scanning speed is too fast for us to notice interval.
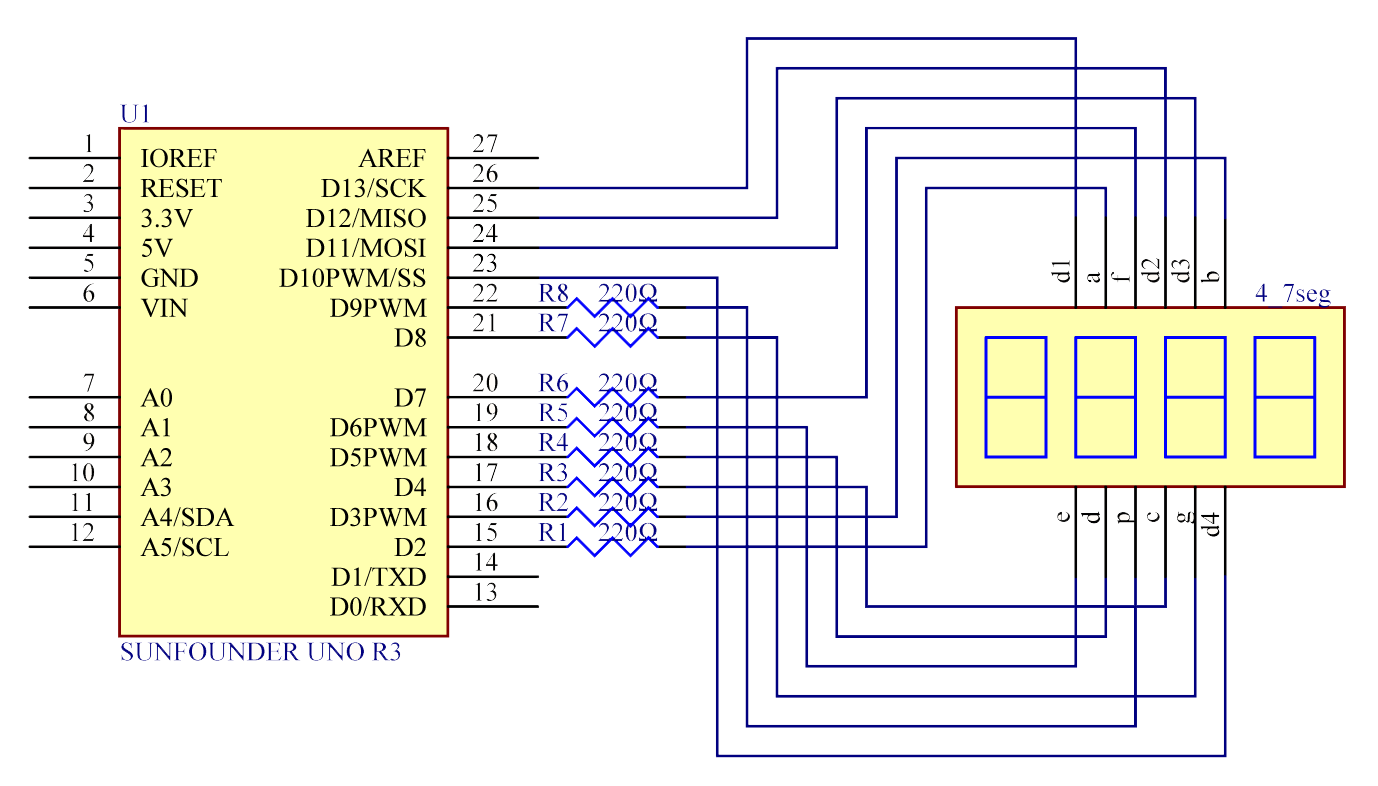
The schematic diagram of the 4-digit 7-segment display is as shown below:

Experimental Procedures
Step 1: Build the circuit
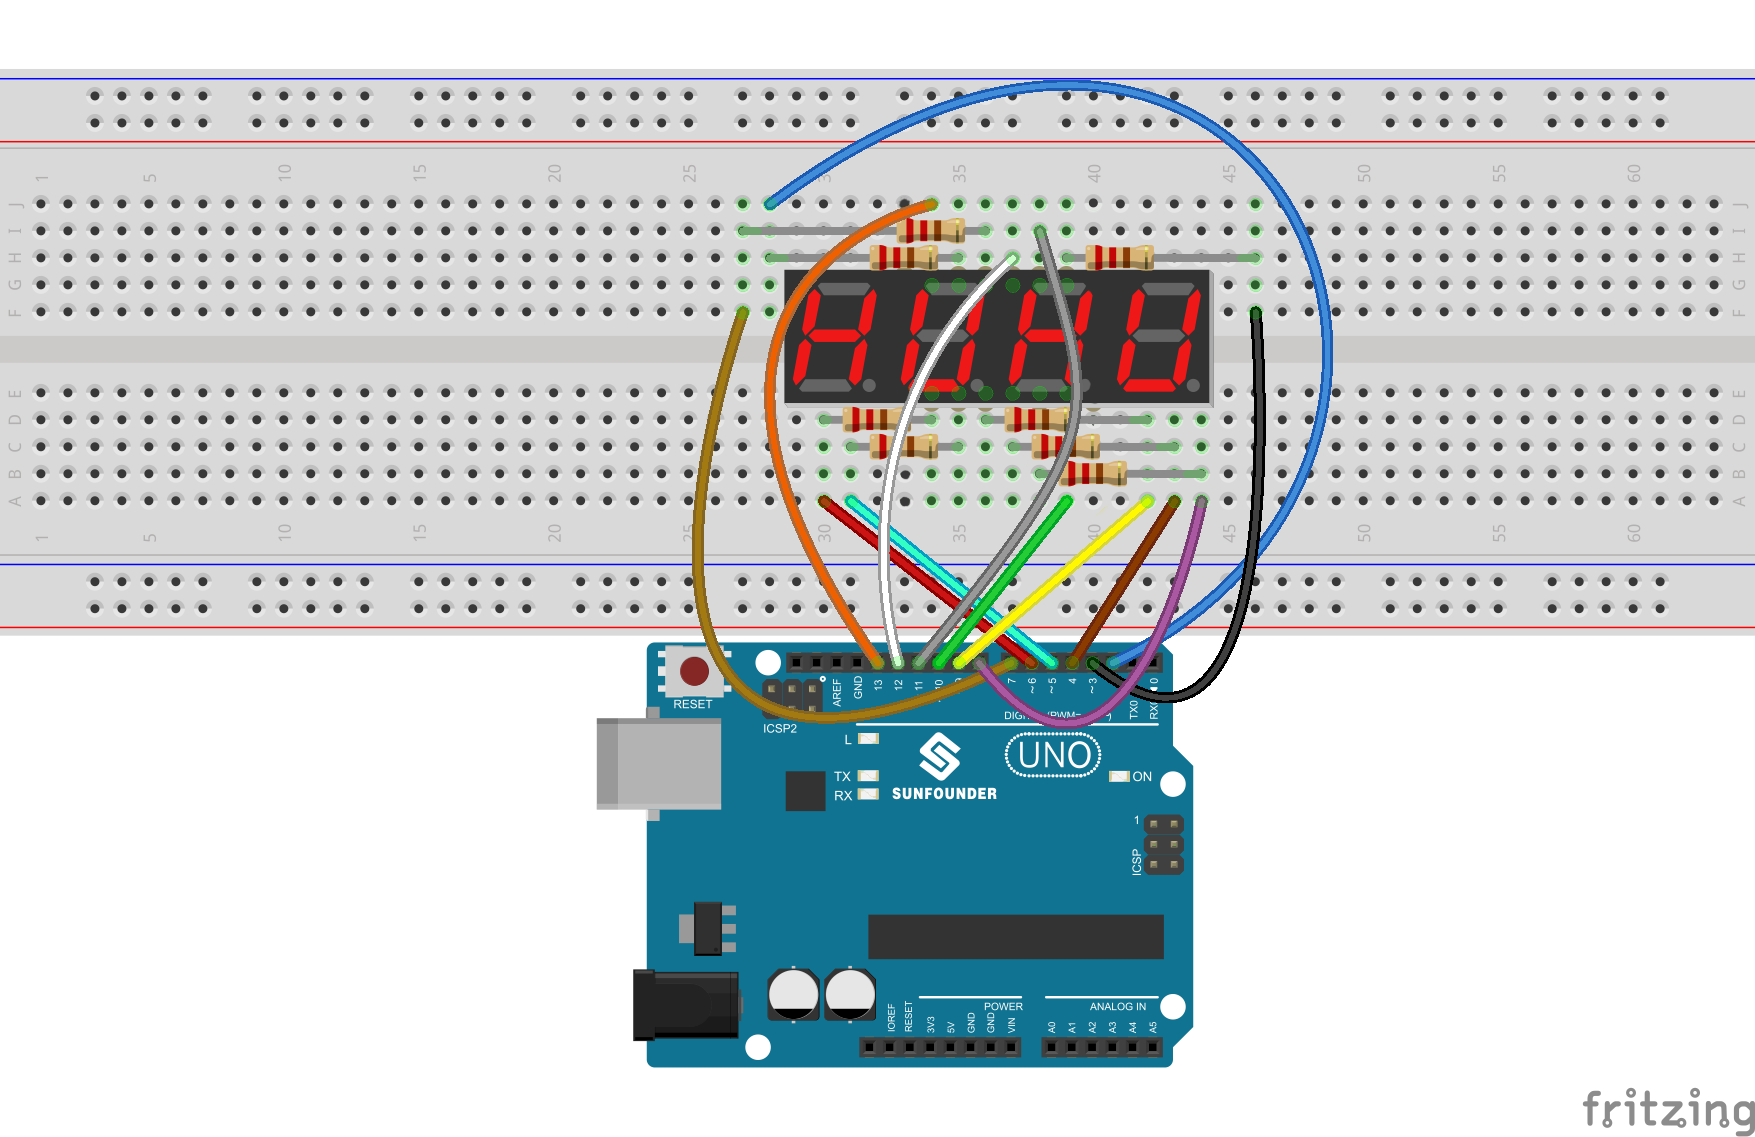
The wiring between the 4-digit 7-segment display and the SunFounder Uno board is as shown below:
| 4-Digit 7-Segment Display | SunFounder Uno |
| a | 2 |
| b | 3 |
| c | 4 |
| d | 5 |
| e | 6 |
| f | 7 |
| g | 8 |
| p | 9 |
| D1 | 13 |
| D2 | 12 |
| D3 | 11 |
| D4 | 10 |

The schematic diagram

Step 2: Program (Please refer to the example code in LEARN -> Get Tutorials on our website)
Note: Here you need to add a library-TimerOne_r11
Step 3: Compile the code
Step 4: Upload the sketch to the SunFounder Uno board
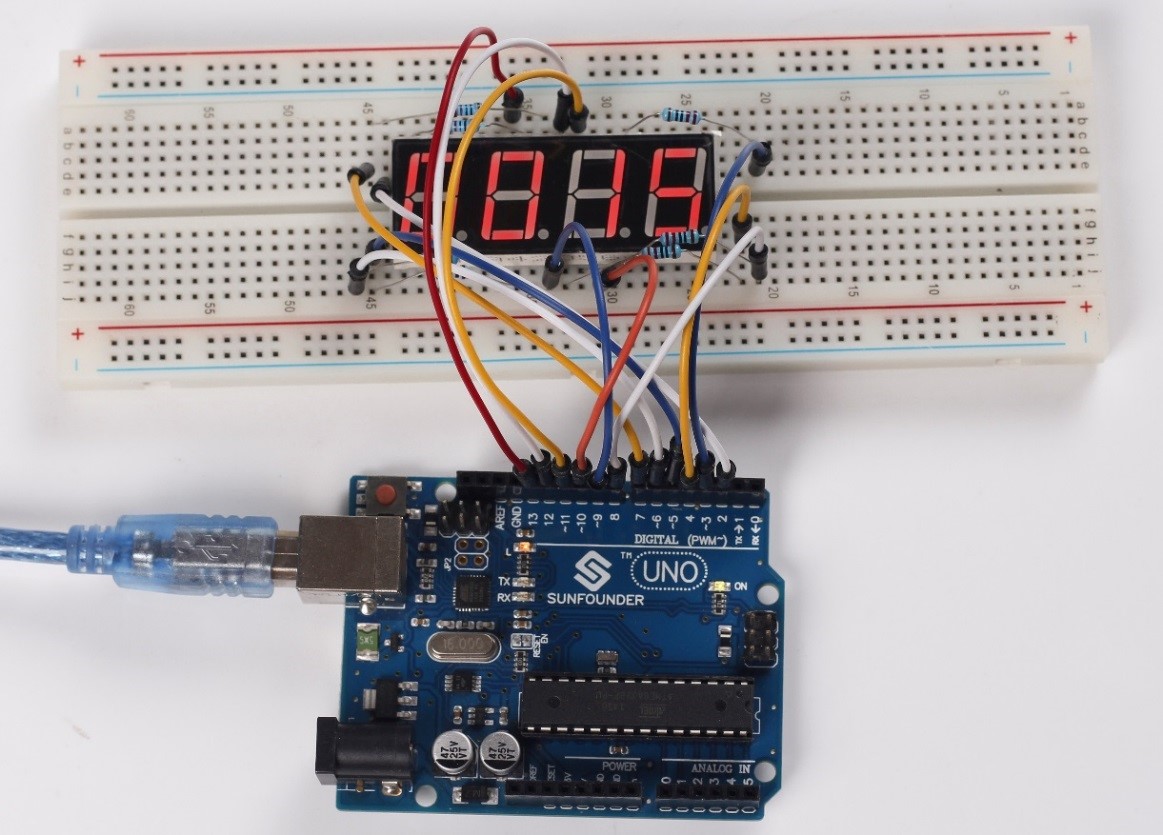
Now, you can see the number increases by one per second on the 4-digit 7-segment display.

Code
| /*************************************** name:Stopwatch function: you can see the number increases by one per second on the 4-digit 7-segment display. ***********************************/ //Email:support@sunfounder.com //Website:www.sunfounder.com/**************************************/ #include <TimerOne.h> //the pins of 4-digit 7-segment display attach to pin2-13 respectively int a = 2; int b = 3; int c = 4; int d = 5; int e = 6; int f = 7; int g = 8; int p = 9;int d4 = 10; int d3 = 11; int d2 = 12; int d1 = 13;long n = 0;// n represents the value displayed on the LED display. For example, when n=0, 0000 is displayed. The maximum value is 9999. int x = 100; int del = 5;//Set del as 5; the value is the degree of fine tuning for the clock int count = 0;//Set count=0. Here count is a count value that increases by 1 every 0.1 second, which means 1 second is counted when the value is 10void setup() { //set all the pins of the LED display as output pinMode(d1, OUTPUT); pinMode(d2, OUTPUT); pinMode(d3, OUTPUT); pinMode(d4, OUTPUT); pinMode(a, OUTPUT); pinMode(b, OUTPUT); pinMode(c, OUTPUT); pinMode(d, OUTPUT); pinMode(e, OUTPUT); pinMode(f, OUTPUT); pinMode(g, OUTPUT); pinMode(p, OUTPUT); Timer1.initialize(100000); // set a timer of length 100000 microseconds (or 0.1 sec – or 10Hz => the led will blink 5 times, 5 cycles of on-and-off, per second) Timer1.attachInterrupt( add ); // attach the service routine here } /***************************************/ void loop() { clearLEDs();//clear the 7-segment display screen pickDigit(0);//Light up 7-segment display d1 pickNumber((n/1000));// get the value of thousand delay(del);//delay 5ms clearLEDs();//clear the 7-segment display screen pickDigit(1);//Light up 7-segment display d2 pickNumber((n%1000)/100);// get the value of hundred delay(del);//delay 5ms clearLEDs();//clear the 7-segment display screen pickDigit(2);//Light up 7-segment display d3 pickNumber(n%100/10);//get the value of ten delay(del);//delay 5ms clearLEDs();//clear the 7-segment display screen pickDigit(3);//Light up 7-segment display d4 pickNumber(n%10);//Get the value of single digit delay(del);//delay 5ms } /**************************************/ void pickDigit(int x) //light up a 7-segment display { //The 7-segment LED display is a common-cathode one. So also use digitalWrite to set d1 as high and the LED will go out digitalWrite(d1, HIGH); digitalWrite(d2, HIGH); digitalWrite(d3, HIGH); digitalWrite(d4, HIGH); switch(x) { case 0: digitalWrite(d1, LOW);//Light d1 up break; case 1: digitalWrite(d2, LOW); //Light d2 up break; case 2: digitalWrite(d3, LOW); //Light d3 up break; default: digitalWrite(d4, LOW); //Light d4 up break; } } //The function is to control the 7-segment LED display to display numbers. Here x is the number to be displayed. It is an integer from 0 to 9 void pickNumber(int x) { switch(x) { default: zero(); break; case 1: one(); break; case 2: two(); break; case 3: three(); break; case 4: four(); break; case 5: five(); break; case 6: six(); break; case 7: seven(); break; case 8: eight(); break; case 9: nine(); break; } } void clearLEDs() //clear the 7-segment display screen { digitalWrite(a, LOW); digitalWrite(b, LOW); digitalWrite(c, LOW); digitalWrite(d, LOW); digitalWrite(e, LOW); digitalWrite(f, LOW); digitalWrite(g, LOW); digitalWrite(p, LOW); } void zero() //the 7-segment led display 0 { digitalWrite(a, HIGH); digitalWrite(b, HIGH); digitalWrite(c, HIGH); digitalWrite(d, HIGH); digitalWrite(e, HIGH); digitalWrite(f, HIGH); digitalWrite(g, LOW); } void one() //the 7-segment led display 1 { digitalWrite(a, LOW); digitalWrite(b, HIGH); digitalWrite(c, HIGH); digitalWrite(d, LOW); digitalWrite(e, LOW); digitalWrite(f, LOW); digitalWrite(g, LOW); } void two() //the 7-segment led display 2 { digitalWrite(a, HIGH); digitalWrite(b, HIGH); digitalWrite(c, LOW); digitalWrite(d, HIGH); digitalWrite(e, HIGH); digitalWrite(f, LOW); digitalWrite(g, HIGH); }void three() //the 7-segment led display 3 { digitalWrite(a, HIGH); digitalWrite(b, HIGH); digitalWrite(c, HIGH); digitalWrite(d, HIGH); digitalWrite(e, LOW); digitalWrite(f, LOW); digitalWrite(g, HIGH); } void four() //the 7-segment led display 4 { digitalWrite(a, LOW); digitalWrite(b, HIGH); digitalWrite(c, HIGH); digitalWrite(d, LOW); digitalWrite(e, LOW); digitalWrite(f, HIGH); digitalWrite(g, HIGH); } void five() //the 7-segment led display 5 { digitalWrite(a, HIGH); digitalWrite(b, LOW); digitalWrite(c, HIGH); digitalWrite(d, HIGH); digitalWrite(e, LOW); digitalWrite(f, HIGH); digitalWrite(g, HIGH); } void six() //the 7-segment led display 6 { digitalWrite(a, HIGH); digitalWrite(b, LOW); digitalWrite(c, HIGH); digitalWrite(d, HIGH); digitalWrite(e, HIGH); digitalWrite(f, HIGH); digitalWrite(g, HIGH); } void seven() //the 7-segment led display 7 { digitalWrite(a, HIGH); digitalWrite(b, HIGH); digitalWrite(c, HIGH); digitalWrite(d, LOW); digitalWrite(e, LOW); digitalWrite(f, LOW); digitalWrite(g, LOW); } void eight() //the 7-segment led display 8 { digitalWrite(a, HIGH); digitalWrite(b, HIGH); digitalWrite(c, HIGH); digitalWrite(d, HIGH); digitalWrite(e, HIGH); digitalWrite(f, HIGH); digitalWrite(g, HIGH); } void nine() //the 7-segment led display 9 { digitalWrite(a, HIGH); digitalWrite(b, HIGH); digitalWrite(c, HIGH); digitalWrite(d, HIGH); digitalWrite(e, LOW); digitalWrite(f, HIGH); digitalWrite(g, HIGH); } /*******************************************/ void add() { // Toggle LED count ++; if(count == 10) { count = 0; n++; if(n == 10000) { n = 0; } } } |
Video
