Introduction
The Temperature Sensor DS18B20 is a commonly used digital temperature sensor featured with small size, low-cost hardware, strong anti-interference capability and high precision. The digital temperature sensor is easy to wire and can be applied a various occasions after packaging. Different from conventional AD collection temperature sensors, it uses a 1-wire bus and can directly outputs temperature data.
Components
– 1 * SunFounder Uno board
– 1 * USB data cable
– 1 * DS18B20 Temperature Sensor module
– 1 * LCD1602
– 1 * Potentiometer
– Several jumper wires
Experimental Principle
With a unique single-wire interface, DS18B20 requires only one pin for a two-way communication with a microprocessor. It supports multi-point networking to measure multi-point temperatures. Eight DS18B20s can be connected at most, because too many of them will consume too much of the power supply and cause low voltage thus instability of signal transmission.
Experimental Procedures
Step 1: Build the circuit
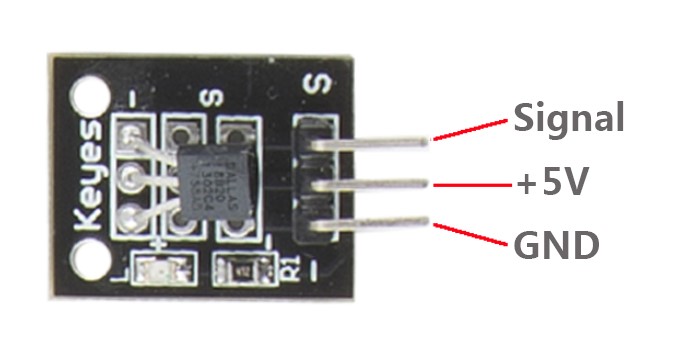
DS18B20 Temperature Sensor SunFounder Uno
S ———————————————— D2
– ———————————————— GND
+ ———————————————— 5V
LCD1602 connection: connect pin RS to digital pin 4; R/W to GND; E to digital pin 5; D4~D7 to digital pin 9 to 12; VSS to GND; VDD to 5V; A to 3.3V; K to GND
Potentiometer connection: Connect the middle pin to VO of LCD1602 and any other pin to GND
Step 2: Program (Please refer to the example code in LEARN -> Get Tutorial on our website)
Step 3: Compile
Step 4: Upload the sketch to SunFounder Uno
Now, you can see the value of the current temperature displayed on the LCD.

Code
| #include <OneWire.h> #include <DallasTemperature.h> #include <LiquidCrystal.h> // Data wire is plugged into port 2 on the Arduino #define ONE_WIRE_BUS 2 // Setup a oneWire instance to communicate with any OneWire devices (not just Maxim/Dallas temperature ICs) OneWire oneWire(ONE_WIRE_BUS); // Pass our oneWire reference to Dallas Temperature. DallasTemperature sensors(&oneWire); LiquidCrystal lcd(4, 5,9, 10, 11, 12);void setup(void) { lcd.begin(16, 2); // start serial port Serial.begin(9600); Serial.println(“Dallas Temperature IC Control Library Demo”); // Start up the library sensors.begin(); } void loop(void) { // call sensors.requestTemperatures() to issue a global temperature // request to all devices on the bus Serial.print(“Requesting temperatures…”); sensors.requestTemperatures(); // Send the command to get temperatures Serial.println(“DONE”); lcd.setCursor(0, 0); lcd.print(“Tem: “); lcd.print(sensors.getTempCByIndex(0));//print the temperature on lcd1602 lcd.print(” C”); lcd.setCursor(0, 1); lcd.print(“Tem: “); lcd.print(sensors.getTempCByIndex(0) + 273.15);//print the temperature on lcd1602 lcd.print(” F”); Serial.print(“Temperature for the device 1 (index 0) is: “); Serial.println(sensors.getTempCByIndex(0)); //print the temperature on serial monitor } |