Introduction
In this lesson, we will learn how to make eight LEDs blink in various effects as you want based on Raspberry Pi.
Experimental Conditions
– 1*Raspberry Pi
– 1*Breadboard
– 1*Network cable (or USB wireless network adapter)
– 8*LED
– 8*Resistor (220Ω)
– Jumper wires
Experimental Principle
Set GPIO0 to GPIO7 to low in turn by programming, then LED0 to LED7 will light up in turn. You can make eight LEDs blink in different effects by controlling their delay time and the order of lighting up.
Experimental Procedures
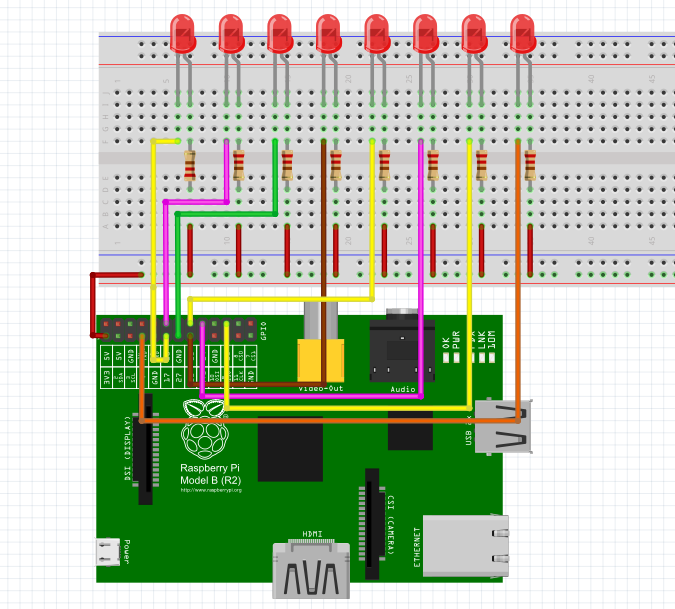
Step 1: Connect the circuit as shown in the following diagram
Step 2: Edit and save the code with vim (see path/Rpi_LcdStartKit /02_8led/8Led.c)
Step 3: Compile the code
| gcc 8Led.c -lwiringPi |
Step 4: Run the program
| ./a.out |
Now, when you press Enter, eight LEDs will light up circularly and render different effects.

Further Exploration
We can write the blinking effects of LEDs in an array. If you want to use one of these effects, you can call it in the main() function directly.
Code
| #include <wiringPi.h> #include <stdio.h> //make led_n on void led_on(int n) { digitalWrite(n, LOW); } //make led_n off void led_off(int n) { digitalWrite(n, HIGH); } int main(void) { int i; if(wiringPiSetup() == -1){ //when initialize wiring failed,print messageto screen printf(“setup wiringPi failed !”); return 1; } for(i=0;i<8;i++){ printf(“linker LedPin : GPIO %d(wiringPi pin)\n”,i); //when initialize wiring successfully,print message to screen } for(i=0;i<8;i++){ //make 8 pins’ mode is output pinMode(i, OUTPUT); } while(1){ for(i=0;i<8;i++){ //make led on from left to right led_on(i); delay(100); led_off(i); } // delay(500); for(i=8;i>=0;i–){ //make led off from right to left led_on(i); delay(100); led_off(i); } } return 0; } |