Introduction
Each button of an IR remote control (as shown below) has a string of specific encoding. When a button is pressed, the IR transmitter in the remote control will send out the corresponding IR encoding signals. On the other side, when the IR receiver receives certain encoding signals, it will decode them to identify which button is pressed.
Required Components
– 1 * Raspberry Pi
– 1 * Breadboard
– 1 * IR Receiver
– 1 * RGB LED module
– 1 * IR Remote Control
– 1 * 3-Pin anti-reverse cable
– 1 * 4-Pin anti-reverse cable
Experimental Principle
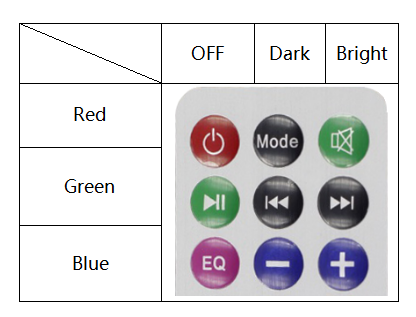
In this experiment, we use the lirc library to read infrared signals returned by buttons of the remote control and translate them to button values. Then use liblircclient-dev (C) and pylirc (Python) to simplify the process for reading values from the remote control. In this experiment use 9 buttons on the top of the remote to control the color of the RGB LED module. Each row represents one color, and each column represents the brightness.
Experimental Procedures
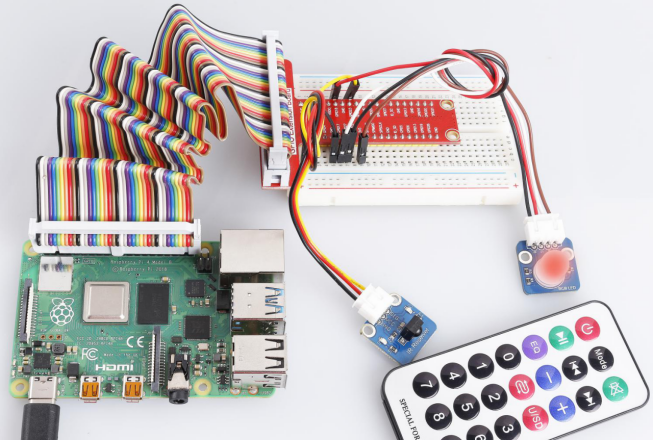
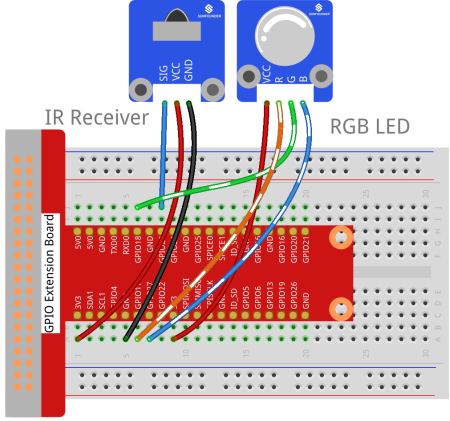
Step 1: Build the circuit.
| Raspberry Pi | GPIO Extension Board | IR Receiver Module |
| GPIO4 | GPIO23 | SIG |
| 3.3V | 3V3 | VCC |
| GND | GND | GND |
| Raspberry Pi | GPIO Extension Board | RGB LED Module |
| 3.3V | 3V3 | VCC |
| GPIO0 | GPIO17 | R |
| GPIO1 | GPIO18 | G |
| GPIO2 | GPIO27 | B |
Step 2: Upgrade.
sudo su -c "grep '^deb ' /etc/apt/sources.list | sed 's/^deb/deb-src/g' > /etc/apt/sources.list.d/deb-src.list"
sudo apt update
sudo apt install devscripts
Step 3: Installing with a patch for gpio-ir in Raspbian Buster or higher version.
sudo apt install dh-exec doxygen expect libasound2-dev libftdi1-dev libsystemd-dev libudev-dev libusb-1.0-0-dev libusb-dev man2html-base portaudio19-dev socat xsltproc python3-yaml dh-python libx11-dev python3-dev python3-setuptools
mkdir build
cd build
apt source lirc
wget https://raw.githubusercontent.com/neuralassembly/raspi/master/lirc-gpio-ir-0.10.patch
patch -p0 -i lirc-gpio-ir-0.10.patch
cd lirc-0.10.1
debuild -uc -us -b
cd ..
sudo apt install ./liblirc0_0.10.1-5.2_armhf.deb ./liblircclient0_0.10.1-5.2_armhf.deb ./lirc_0.10.1-5.2_armhf.deb
Installing with a patch for gpio-ir in Raspbian Stretch:
sudo apt build-dep lirc
mkdir build
cd build
apt source lirc
wget https://raw.githubusercontent.com/neuralassembly/raspi/master/lirc-gpio-ir.patch
patch -p0 -i lirc-gpio-ir.patch
cd lirc-0.9.4c
debuild -uc -us -b
cd ..
sudo apt install ./liblirc0_0.9.4c-9_armhf.deb ./liblirc-client0_0.9.4c-9_armhf.deb ./lirc_0.9.4c-9_armhf.deb
If you encounter problems during the installation process, please try a few more times. The final install command will fail. Then please configure the files shown below first, i.e., /boot/config.txt and /etc/lirc/lirc_options.conf. After that, please try the final install command again. Then the install will success.
Step 4: Set up lirc.
Open your /boot/config.txt file:
sudo nano /boot/config.txtAdd this to the file:
# Uncomment this to enable the lirc-rpi module
#dtoverlay=lirc-rpi
dtoverlay=gpio-ir,gpio_pin=23
dtoverlay=gpio-ir-tx,gpio_pin=22
Press Ctrl +O and Ctrl +X, save and exit .
Step 5: When you are using Raspbian Buster, first, please execute the following command.
sudo mv /etc/lirc/lirc_options.conf.dist /etc/lirc/lirc_options.conf
sudo mv /etc/lirc/lircd.conf.dist /etc/lirc/lircd.co
Step 6: edit /etc/lirc/lirc_options.conf.
Open the /etc/lirc/lirc_options.conf
sudo nano /etc/lirc/lirc_options.confModify the file as below:
driver = default
device = /dev/lirc1
Step 7: Run install command again.
sudo apt install ./liblirc0_0.10.1-5.2_armhf.deb ./liblircclient0_0.10.1-5.2_armhf.deb ./lirc_0.10.1-5.2_armhf.deb Step 8: Copy the configuration file to/home/pi and /etc/lirc:
cd /home/pi/SunFounder_SensorKit_for_RPi2
cp lircd.conf /home/pi
sudo cp lircd.conf /etc/lirc/
Step 9: Reboot the Raspberry Pi after the change.
sudo rebootStep 10: Test the IR receiver.
Check if lirc module is loaded:
ls /dev/li*You should see this:
/dev/lirc0 /dev/lirc1Step 11: Run the command to start outputting raw data from the IR receiver:
irw
When you press a button on the remote, you can see the button name printed on the screen.
pi@raspberrypi:~ $ irw
0000000000000001 00 KEY_CHANNELDOWN ./lircd.conf
0000000000000003 00 KEY_CHANNELUP ./lircd.conf
0000000000000002 00 KEY_CHANNEL ./lircd.conf
0000000000000004 00 KEY_PREVIOUS ./lircd.conf
0000000000000005 00 KEY_NEXT ./lircd.conf
0000000000000006 00 KEY_PLAYPAUSE ./lircd.conf
0000000000000008 00 KEY_VOLUMEDOWN ./lircd.conf
0000000000000007 00 KEY_VOLUMEUP ./lircd.conf
0000000000000009 00 KEY_EQUAL ./lircd.conf
0000000000000015 00 BTN_1 ./lircd.conf
0000000000000014 00 BTN_0 ./lircd.conf
000000000000000a 00 KEY_NUMERIC_0 ./lircd.conf
000000000000000b 00 KEY_NUMERIC_1 ./lircd.conf
If it does not appear, somewhere may be incorrectly configured. Check again that you’ve connected everything and haven’t crossed any wires.
For C Users:
Step 5: Download LIRC client library:
sudo apt-get install liblircclient-devStep 6: Change directory.
cd /home/pi/SunFounder_SensorKit_for_RPi2/C/23_ircontrol/Step 7: Copy the lircrc file to /etc/lirc/lirc/:
sudo cp lircrc /etc/lirc/Step 8: Compile.
gcc ircontrol.c -lwiringPi -llirc_clientStep 9: Run.
sudo ./a.outFor Python Users:
Step 5: Download and install pylirc:
Pylirc is LIRC Python wrapper and it’s required to access LIRC from Python programs. To install Pylirc you should complete the following steps.
Install Pylirc dependencies:
sudo apt-get install python3-dev
sudo apt-get install liblircclient-dev
Install Pylirc:
wget https://files.pythonhosted.org/packages/a9/e1/a19ed9cac5353ec07294be7b1aefc8f89985987b356e916e2c39b5b03d9a/pylirc2-0.1.tar.gz
tar xvf pylirc2-0.1.tar.gz
cd pylirc2-0.1
Step 6: Replace file pylircmodule.c:
rm pylircmodule.c
wget https://raw.githubusercontent.com/project-owner/Peppy.doc/master/files/pylircmodule.c=
Step 7: Install Pylirc (assuming that Python 3.7 is in use):
sudo python3 setup.py install
sudo mv /usr/local/lib/python3.7/dist-packages/pylircmodule.cpython-37m-arm-linux-gnueabihf.so /usr/local/lib/python3.7/dist-packages/pylirc.cpython-37m-arm-linux-gnueabihf.so
Step 8: Change directory:
cd /home/pi/SunFounder_SensorKit_for_RPi2/Python/Step 9: Run.
sudo python3 23_ircontrol.pyEach of the top three rows of buttons on the remote control represents a kind of color, i.e. red, green, and blue, top to bottom. Each column represents off, light, and dark. For example, press the second button (light) on the first row (red), and the LED will flash light red. You can use the remote to generate 27 colors in total (including all the LEDs off). Try to change the color of the RGB LED with the 9 buttons!