Introduction
A joystick is an input device consisting of a stick that pivots on a base and reports its angle or direction to the device it is controlling. Joysticks are often used to control video games and robots. A Joystick PS2 is used here.

Components
– 1 * Raspberry Pi
– 1 * Network cable (or USB wireless network adapter)
– 1 * ADC0832
– 1 * Joystick PS2 module
– Several jumper wires
Experimental Principle
This module has two analog outputs (corresponding to X and Y biaxial offsets) and one digital output representing whether it is pressed on Z axis. The module integrates a power indicator and can display the working condition.
In this experiment, we connect pin X and Y to analog input ports of A/D convertor to convert analog quantity into digital quantity. Then program Raspberry Pi to detect the moving direction of the Joystick.
Experimental Procedures
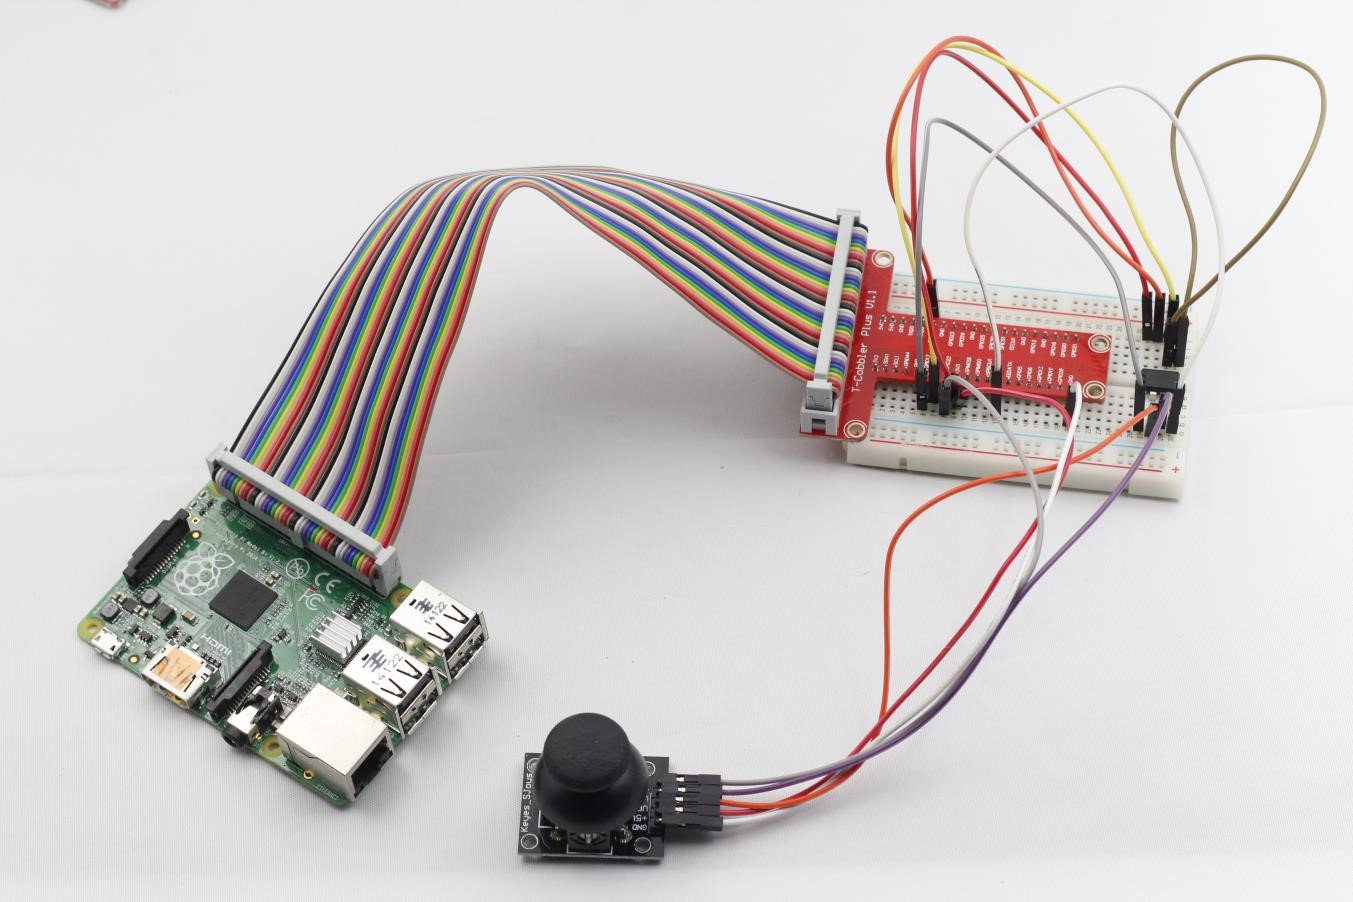
Step 1: Build the circuit
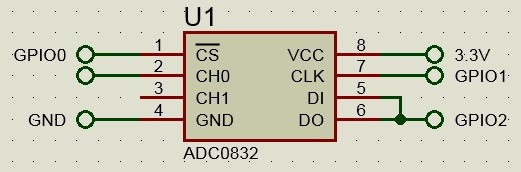
Connect pin VRx on Joystick PS2 module to pin CH0 on ADC0832;
Connect pin VRy on Joystick PS2 module to pin CH1 on ADC0832;
Connect pin SW on Joystick PS2 module to GPIO3 on Raspberry Pi.
Step 2: Edit and save the code (see path/Rpi_SensorKit_Code/27_joyStickPS2/joyStickPS2.c)
Step 3: Compile
gcc joyStickPS2.c -lwiringPi
Step 4: Run
./a.out
Push the rocker up and a string “Up” will be displayed on the screen; pull it down, “Down” will be displayed; push it left, “Left” will be displayed; push it right, “Right” will be displayed; Press the button and “Pressed” will be displayed on the screen.
joyStickPS2.c
#include <wiringPi.h>
#include <stdio.h>

typedef unsigned char uchar;
typedef unsigned int uint;

#define     ADC_CS    0
#define     ADC_CLK   1
#define     ADC_DIO   2
#define  JoyStick_Z   3

uchar get_ADC_Result(uchar xyVal)
{
	//10:CH0
	//11:CH1
	uchar i;
	uchar dat1=0, dat2=0;

	digitalWrite(ADC_CS, 0);

	digitalWrite(ADC_CLK,0);
	digitalWrite(ADC_DIO,1);	delayMicroseconds(2);
	digitalWrite(ADC_CLK,1);	delayMicroseconds(2);
	digitalWrite(ADC_CLK,0);

	digitalWrite(ADC_DIO,1);    delayMicroseconds(2); //CH0 10
	digitalWrite(ADC_CLK,1);	delayMicroseconds(2);
	digitalWrite(ADC_CLK,0);

	if(xyVal == 'x'){
		digitalWrite(ADC_DIO,0);	delayMicroseconds(2); //CH0 0
	}
	if(xyVal == 'y'){
		digitalWrite(ADC_DIO,1);	delayMicroseconds(2); //CH1 1
	}
	digitalWrite(ADC_CLK,1);
	digitalWrite(ADC_DIO,1);    delayMicroseconds(2);
	digitalWrite(ADC_CLK,0);
	digitalWrite(ADC_DIO,1);    delayMicroseconds(2);

	for(i=0;i<8;i++)
	{
		digitalWrite(ADC_CLK,1);	delayMicroseconds(2);
		digitalWrite(ADC_CLK,0);    delayMicroseconds(2);

		pinMode(ADC_DIO, INPUT);
		dat1=dat1<<1 | digitalRead(ADC_DIO);
	}

	for(i=0;i<8;i++)
	{
		dat2 = dat2 | ((uchar)(digitalRead(ADC_DIO))<<i);
		digitalWrite(ADC_CLK,1); 	delayMicroseconds(2);
		digitalWrite(ADC_CLK,0);    delayMicroseconds(2);
	}

	digitalWrite(ADC_CS,1);

	pinMode(ADC_DIO, OUTPUT);

	return(dat1==dat2) ? dat1 : 0;
}

int main(void)
{
	uchar tmp;
	uchar xVal = 0, yVal = 0, zVal = 0;

	if(wiringPiSetup() == -1){
		printf("setup wiringPi failed !");
		return 1;
	}

	pinMode(ADC_CS,  OUTPUT);
	pinMode(ADC_CLK, OUTPUT);
	pinMode(JoyStick_Z, INPUT);

	pullUpDnControl(JoyStick_Z, PUD_UP);

	while(1){
		pinMode(ADC_DIO, OUTPUT);

		xVal = get_ADC_Result('x');
		if(xVal == 0){
			tmp = 1; //up
		}
		if(xVal == 255){
			tmp = 2; //down
		}

		yVal = get_ADC_Result('y');
		if(yVal == 0){
			tmp = 3; //left
		}
		if(yVal == 255){
			tmp = 4; //right
		}

		zVal = digitalRead(JoyStick_Z);
		if(zVal == 0){
			printf("Button is pressed !\n");
		}

		//printf("x : %d   y : %d   z : %d\n", xVal, yVal, zVal);
		switch(tmp){
			case 1: printf("up\n"); break;
			case 2: printf("down\n"); break;
			case 3: printf("right\n"); break;
			case 4: printf("left\n"); break;
			default:
				break;
		}

		//delay(500);
	}

	return 0;
}
Python Code
#!/usr/bin/env python
#------------------------------------------------------
#
#		This is a program for JoystickPS2 Module.
#
#		This program depend on ADC0832 ADC chip. Follow
#	the instruction book to connect the module and
#	ADC0832 to your Raspberry Pi.
#
#------------------------------------------------------
import ADC0832
import RPi.GPIO as GPIO
import time

btn = 15	# Define button pin

def setup():
	ADC0832.setup()				# Setup ADC0832
	GPIO.setmode(GPIO.BOARD)	# Numbers GPIOs by physical location
	GPIO.setup(btn, GPIO.IN, pull_up_down=GPIO.PUD_UP)	# Setup button pin as input an pull it up
	global state
	state = ['up', 'down', 'left', 'right']

def getResult():	#get joystick result
	if ADC0832.getResult1() == 0:
		return 1		#up
	if ADC0832.getResult1() == 255:
		return 2		#down

	if ADC0832.getResult() == 0:
		return 3		#left
	if ADC0832.getResult() == 255:
		return 4		#right

	if GPIO.input(btn) == 1:
		print 'Button is pressed!'		# Button pressed

def loop():
	while True:
		tmp = getResult()
		if tmp != None:
			print state[tmp - 1]

def destory():
	GPIO.cleanup()				# Release resource

if __name__ == '__main__':		# Program start from here
	setup()
	try:
		loop()
	except KeyboardInterrupt:  	# When 'Ctrl+C' is pressed, the child program destroy() will be  executed.
		destory()