Introduction
In this lesson, we will learn how to turn an LED on or off by a button.
Experimental Conditions
– 1*Raspberry Pi
– 1*Breadboard
– 1*Network cable (or USB wireless network adapter)
– 1*LED
– 1*Button
– 1*Resistor (220Ω)
– Jumper wires
Experimental Principle

Use a normally open button as an input of Raspberry Pi, when the button is pressed, the GPIO (General Purpose Input/Output) connected to the button will turn into low level (0V). We can detect the state of the GPIO connected to the button through programming. That is, if the GPIO turns into low level, it means the button is pressed, you can run the corresponding code according to this condition. In this experiment, we make the LED light up.
Experimental Procedures
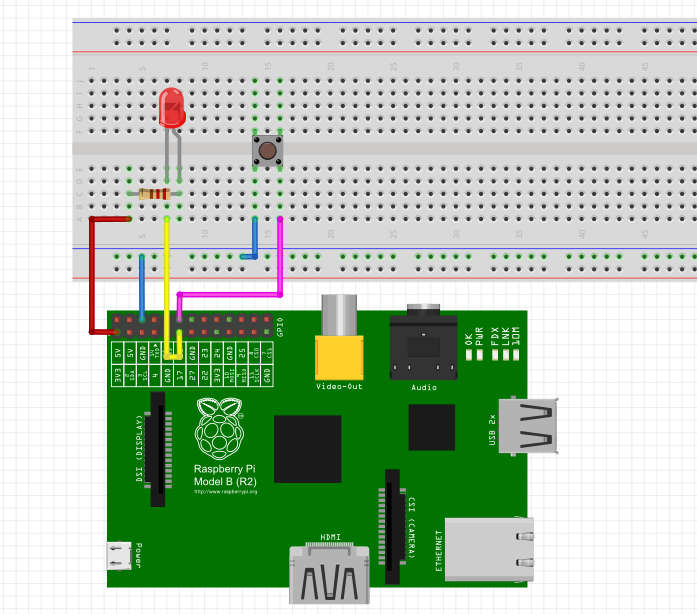
Step 1: Connect the circuit as shown in the following diagram
Step 2: Edit and save the code with vim (see path/Rpi_LcdStartKit /03_BtnAndLed/
BtnAndLed.c)
Step 3: Compile the code
| gcc BtnAndLed.c -lwiringPi |
Step 4: Run the program
| ./a.out |
Press Enter, when you press the button, the LED will light up; when you release the button, the LED will go out.

Summary
Through this experiment, you have basically mastered the Input and Output programming operation of Raspberry Pi GPIOs. I hope you can make persistent efforts and continue to learn the next contents.
Code
| #include <wiringPi.h> #include <stdio.h> #define LedPin 0 #define ButtonPin 1 int main(void) { if(wiringPiSetup() == -1){ //when initialize wiring failed,print messageto screen printf(“setup wiringPi failed !”); return 1; } pinMode(LedPin, OUTPUT); pinMode(ButtonPin, INPUT); pullUpDnControl(ButtonPin, PUD_UP); //pull up to 3.3V,make GPIO1 a stable level while(1){ digitalWrite(LedPin, HIGH); if(digitalRead(ButtonPin) == 0){ //indicate that button has pressed down digitalWrite(LedPin, LOW); //led on } } return 0; } |