Introduction
After having learnt so many independent modules, let’s combine these modules together to make some funny interactive works. In this lesson, we will use an I2C LCD1602, a Relay module, a potentiometer and a Keypad to assemble a simple password lock. It is based on SunFounder microcontroller and generally used to security door.
Components
– 1*SunFounder Uno board
– 1*USB data cable
– 1*Relay module
– 1*I2C LCD1602
– 1*Keypad
– Several jumper wires
Experimental Principle
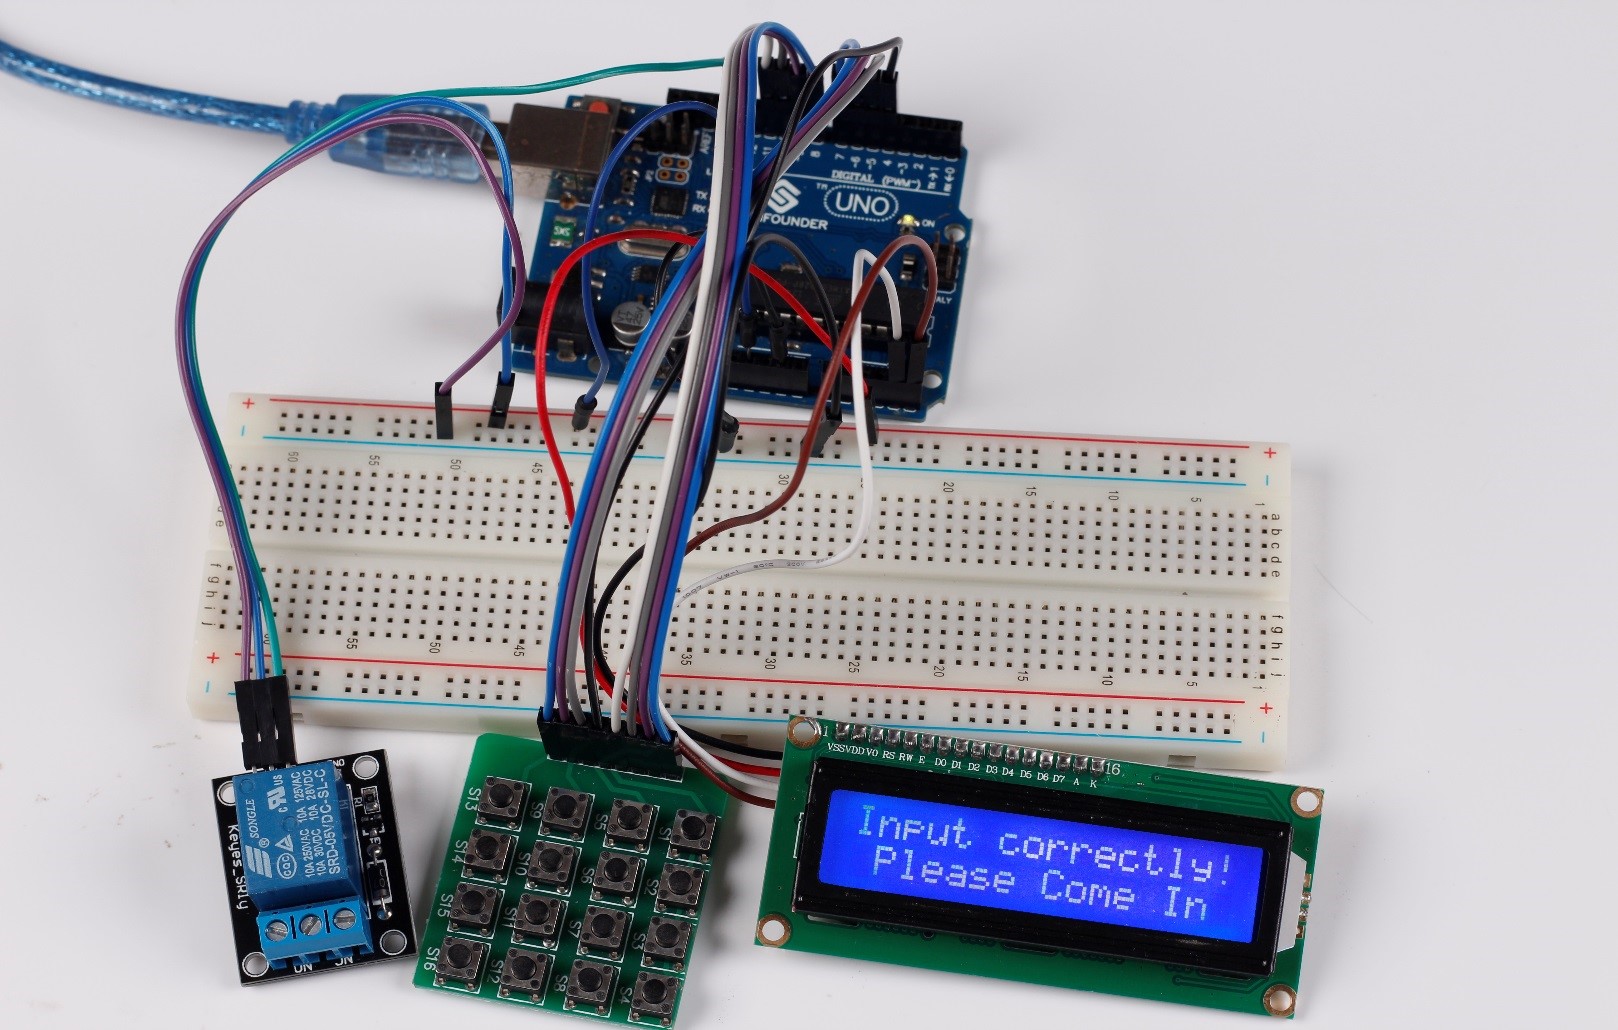
Set a password (for example 123456) by programming. The I2C LCD1602 displays “Welcome!” after power on. At this point, the normally open contact of the relay is disconnected, and the indicator LED on the relay module keeps off. Press the asterisk “*” key to input the password, and then press “#”. If the password is correct, the normally open contact of the relay will be closed and the indicator light will be on. The I2C LCD1602 will display “Input Correctly” “Please Come In”. If you input other contents, the I2C LCD1602 will display “Input Error!” “Please Again”, and the relay will keep the initial state. Two seconds later, the I2C LCD1602 displays “Welcome!”.
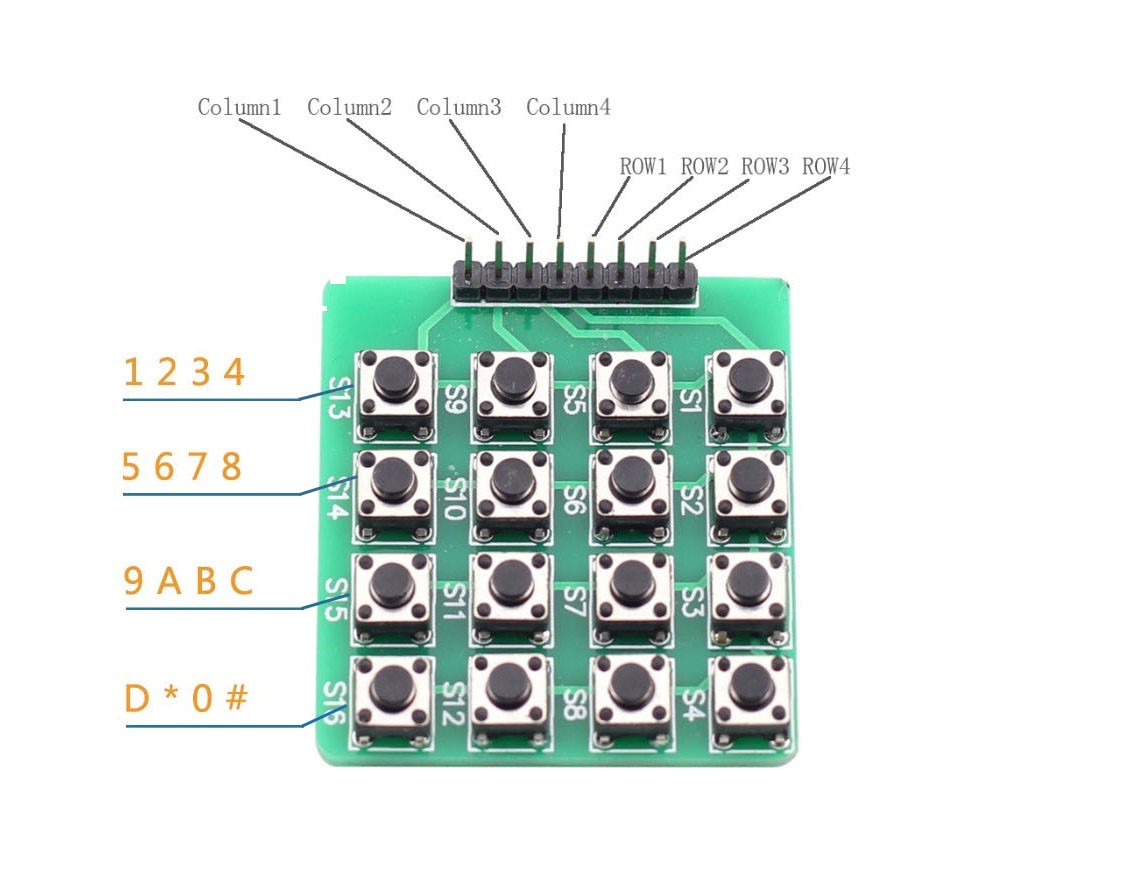
NOTE: Through programming, we’ve set the four keys in the first row (with pins at the top as shown in the figure above) as 1, 2, 3, 4; those in the second row as 5, 6, 7, 8; in the third as 9, A, B, C; and in the fourth as D, *, 0, #.
Experimental Procedures
Step 1: Connect the circuit
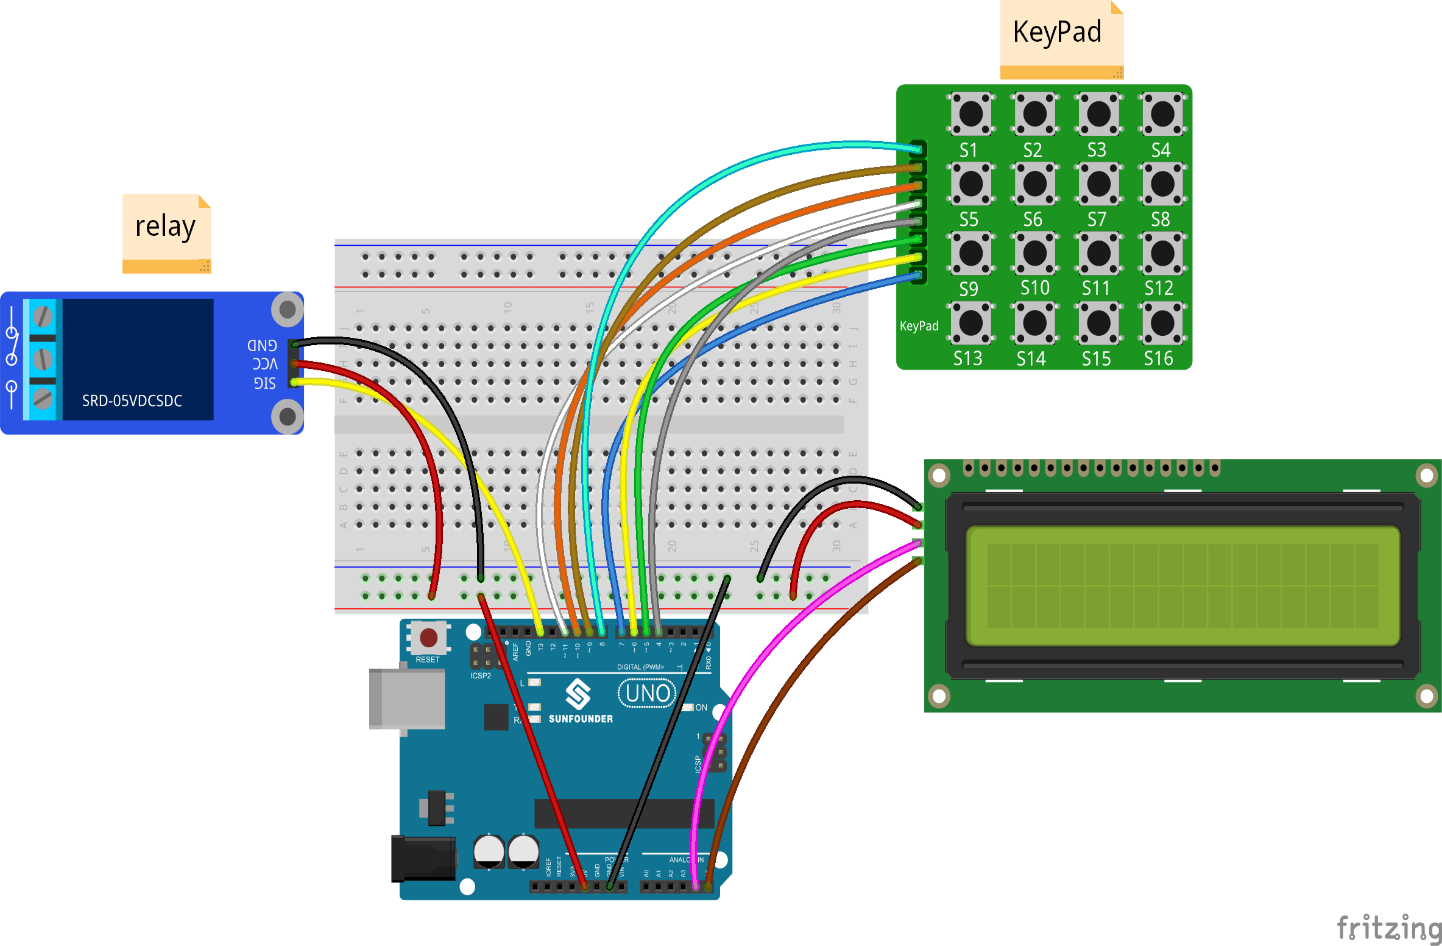
The wiring between the I2C LCD1602 and the SunFounder Uno board:
| I2C LCD1602 | SunFounder Uno |
| GND | GND |
| VCC | 5v |
| SDA | A4 |
| SCL | A5 |
The wiring between the relay module and the SunFounder Uno board:
| Relay Module | SunFounder Uno |
| SIG | 13 |
| VCC | 5V |
| GND | GND |
The wiring between the keypad and the SunFounder Uno board:
| Keypad | SunFounder Uno |
| Column 1 | 7 |
| Column 2 | 6 |
| Column 3 | 5 |
| Column 4 | 4 |
| Row 1 | 11 |
| Row 2 | 10 |
| Row 3 | 9 |
| Row 4 | 8 |
Step 2: Program (Please refer to the example code in LEARN -> Get Tutorials on our website)
Note: Here you need to add a library. Refer to the description in Lesson 4 previously in the manual.
Step 3: Compile the code
Step 4: Upload the sketch to the SunFounder Uno board
Now, the I2C LCD1602 will display “Welcome!“ after power on. At this point, the indicator LED on the relay keeps off. When you press “*” key, it will prompt “Input Your Code:”. If you enter “123456” and press “#” key to confirm, the indicator LED on the relay module will light up. The I2C LCD1602 will display “Input Correctly” “Please Come In”. Two seconds later, “Welcome!” will be displayed on the I2C LCD1602. But if you input other contents, it will display “Input Error!” “Please Again”, and the relay will keep the initial state. Two seconds later, the I2C LCD1602 displays “Welcome!”.
Code
| /******************************************************* * name:Password Lock * function: the I2C LCD1602 will display “Welcome!” after power on. * At this point, the indicator LED on the relay keeps off. * When you press “*” key, it will prompt “Input Your Code:”. If you enter “123456” and press “#” key to confirm, * the indicator LED on the relay module will light up. The I2C LCD1602 will display “Input Correctly” “Please Come In”. * Two seconds later, “Welcome!” *********************************************************/ //Email:support@sunfounder.com //Website:www.sunfounder.com#include <Keypad.h> #include <Wire.h> #include <LiquidCrystal_I2C.h> LiquidCrystal_I2C lcd(0x27,16,2); #define relayPin 13 //relay attach to pin 13 const byte ROWS = 4; //four rows const byte COLS = 4; //four columns //define the cymbols on the buttons of the keypads char hexaKeys[ROWS][COLS] ={ {‘1′,’2′,’3′,’4’}, {‘5′,’6′,’7′,’8’}, {‘9′,’A’,’B’,’C’}, {‘D’,’*’,’0′,’#’} }; byte rowPins[ROWS] = {11, 10, 9, 8}; //connect to the row pinouts of the keypad byte colPins[COLS] = { 7, 6, 5, 4}; //connect to the column pinouts of the keypad int pos = 0; char secretCode[6] = {‘1’, ‘2’, ‘3’, ‘4’, ‘5’, ‘6’}; char inputCode[6] = {‘0’, ‘0’, ‘0’, ‘0’, ‘0’, ‘0’};//initialize an instance of class NewKeypad Keypad customKeypad = Keypad( makeKeymap(hexaKeys), rowPins, colPins, ROWS, COLS);void setup() { lcd.init(); lcd.backlight(); pinMode(relayPin, OUTPUT); //Serial.begin(9600); lcd.setCursor(0,0); lcd.print(” Welcome! “); delay(2000); }void loop() { readKey(); }void readKey() { int correct = 0; int i; char customKey = customKeypad.getKey(); if (customKey) { switch(customKey) { case ‘*’: pos = 0; lcd.clear(); lcd.setCursor(0,0); lcd.print(“Input Your Code:”); break; case ‘#’: for(i = 0; i < 6; i++) { if(inputCode[i] == secretCode[i]) { correct ++; } } if(correct == 6) { lcd.clear(); lcd.setCursor(0, 0); lcd.print(“Input correctly!”); lcd.setCursor(0, 1); lcd.print(” Please Come In “); digitalWrite(relayPin, HIGH); // delay(2000); // lcd.clear(); // lcd.setCursor(0,0); // lcd.print(” Welcome! “); // digitalWrite(relayPin, LOW); } else { lcd.clear(); lcd.setCursor(0, 0); lcd.print(” Input Error! “); lcd.setCursor(0, 1); lcd.print(” Please Again “); digitalWrite(relayPin, LOW); delay(2000); lcd.clear(); lcd.setCursor(0,0); lcd.print(” Welcome! “); } break; default: inputCode[pos] = customKey; lcd.setCursor(pos,1); lcd.print(inputCode[pos]); pos ++; } } } |