Introduction
After having learnt so many independent modules, let’s use several together to make some comprehensive experiments. In this lesson, we use an LCD1602, a relay module, a potentiometer and a keypad to assemble a simple password lock. The circuit is controlled by the SunFounder Uno board and can be applied in security door. Let’s get started!
Components
– 1 * SunFounder Uno board
– 1 * USB data cable
– 1 * Relay module
– 1 * LCD1602
– 1 * Keypad
– 1 * Potentiometer
– Several jumper wires
Experimental Principle
After the circuit and code are completed, first set a password (for example, 123456) with the SunFounder Uno. Then input the password by the keypad. If this password is consistent with what was set, the relay will be closed and the LED attached to pin 13 of the Uno will light up. Otherwise, the relay will keep opened and the LED will be off.
Experimental Procedures
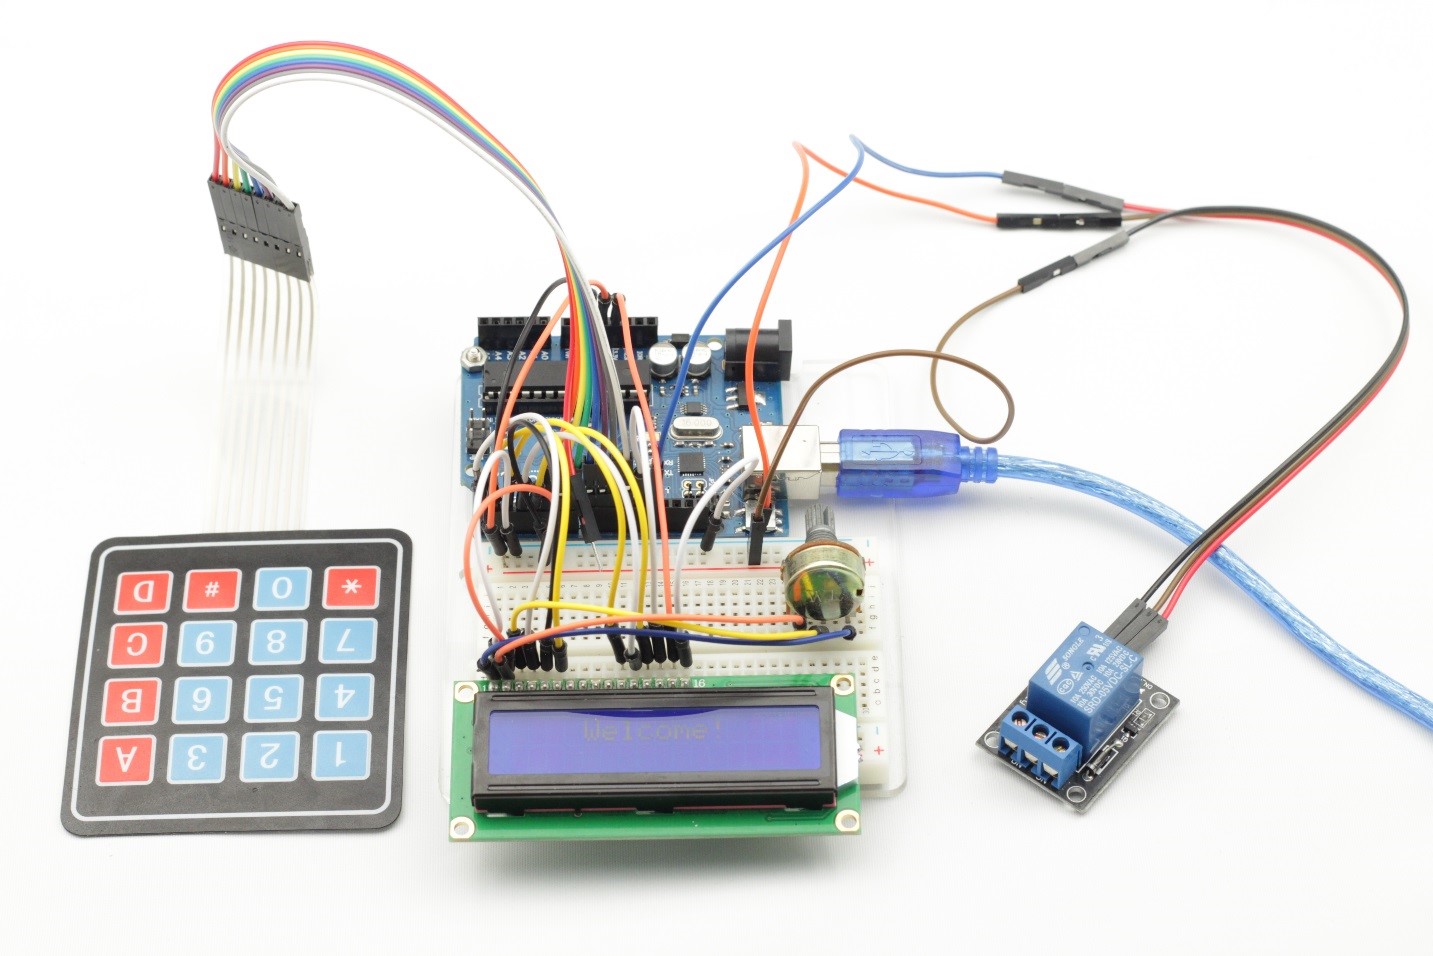
Step 1: Build the circuit
Relay connection: Connect pin S to pin 13 on the SunFounder board, pin – to GND, + to 5V
LCD1602 connection: Connect pin RS to D0; R/W to GND; E to D1; D4~D7 to D2, D3, D4, and D12; VSS to GND; VDD to 5V; A to 3.3V; K to GND
Potentiometer connection: Connect the middle pin to VO of LCD1602 and any other pin to GND
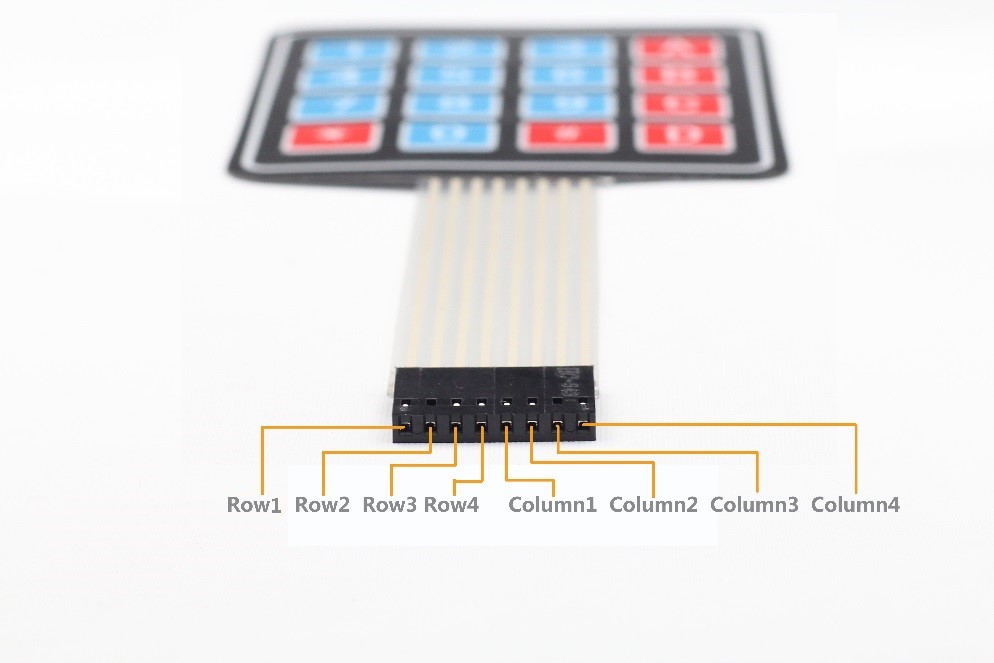
Keypad connection: Connect row 1, 2, 3 and 4 to D11, D10, D9, and D8; connect column 1, 2, and 3 to D7, D6, and D5 (see the following figure for pins connected to columns and rows)
Step 2: Program (Please refer to the example code in LEARN -> Get Tutorial on our website)
Step 3: Compile
Step 4: Upload the sketch to SunFounder Uno
Now, the LCD will show “Welcome” after power on. When you press the * key, it will prompt “Input Your Code:“. If you input 123456 and press # key to confirm, “Input Correctly Please Come In” will be displayed and the LED will light up. If you input other contents, the message “Input Error Please Again” will be shown and the LED will be off.
Code
| #include <Keypad.h> #include <LiquidCrystal.h>LiquidCrystal lcd(0, 1, 2, 3, 4, 12);#define relayPin 13const byte ROWS = 4; //four rows const byte COLS = 3; //four columns //define the cymbols on the buttons of the keypads char hexaKeys[ROWS][COLS] = { {‘1′,’2′,’3’}, {‘4′,’5′,’6’}, {‘7′,’8′,’9’}, {‘*’,’0′,’#’} }; byte rowPins[ROWS] = {11, 10, 9, 8}; //connect to the row pinouts of the keypad byte colPins[COLS] = { 7, 6, 5}; //connect to the column pinouts of the keypadint pos = 0; char secretCode[6] = {‘1’, ‘2’, ‘3’, ‘4’, ‘5’, ‘6’}; char inputCode[6] = {‘0’, ‘0’, ‘0’, ‘0’, ‘0’, ‘0’};//initialize an instance of class NewKeypad Keypad customKeypad = Keypad( makeKeymap(hexaKeys), rowPins, colPins, ROWS, COLS);void setup() { lcd.begin(16, 2); pinMode(relayPin, OUTPUT); //Serial.begin(9600); lcd.setCursor(0,0); lcd.print(” Welcome! “); delay(2000); } void loop() { readKey(); }void readKey() { int correct = 0; int i; char customKey = customKeypad.getKey(); if (customKey) { switch(customKey) { case ‘*’: pos = 0; lcd.clear(); lcd.setCursor(0,0); lcd.print(“Input Your Code:”); break; case ‘#’: for(i = 0; i < 6; i++) { if(inputCode[i] == secretCode[i]) { correct ++; } } if(correct == 6) { lcd.clear(); lcd.setCursor(0, 0); lcd.print(“Input correctly!”); lcd.setCursor(0, 1); lcd.print(” Please Come In “); digitalWrite(relayPin, HIGH); delay(2000); lcd.clear(); lcd.setCursor(0,0); lcd.print(” Welcome! “); } else { lcd.clear(); lcd.setCursor(0, 0); lcd.print(” Input Error! “); lcd.setCursor(0, 1); lcd.print(” Please Again “); digitalWrite(relayPin, LOW); delay(2000); lcd.clear(); lcd.setCursor(0,0); lcd.print(” Welcome! “); } break; default: inputCode[pos] = customKey; lcd.setCursor(pos,1); lcd.print(inputCode[pos]); pos ++; } } } |