Introduction
In this lesson, we will use a Rotary Encoder module, an Analog Temperature Sensor module, a Relay module, a Button module and an I2C LCD1602 to build a Thermostatic Water Tank system. The tank can be used in various situations, such as in the test department of medical organizations and colleges, scientific research, chemical industry, printing and dyeing industry to distil, dry, inspissate and heat chemical medicines and cultivate biological products in a constant temperature, as well as to boil and disinfect equipment.
Components
– 1 * SunFounder Uno board
– 1 * USB data cable
– 1 * Rotary Encoder module
– 1 * Analog Temperature Sensor module
– 1 * LCD1602
– 1 * Relay module
– 1 * Button module
– Several jumper wires
Experimental Principle
In this experiment, we use a thermistor temperature sensor and an LCD to sense and display both the current temperature and the set temperature. A rotary encoder is used to change the set temperature. When the measured temperature value is lower than the set value, the relay is activated. Relays are old-fashioned electromagnetic components that activate a mechanical switch when a current flows through its coil of wire. They can switch high currents and voltages, making them suitable for controlling main equipment.
Experimental Procedures
Step 1: Build the circuit
LCD1602 Connection: connect pin RS to digital pin 12; R/W to GND; E to digital pin 11; D4~D7 to digital pin 10, 9, 8, and 7; VSS to GND; VDD to 5V; A to 3.3V; K to GND
Button Connection: connect pin S to digital pin 5, pin – to GND, and + to 5V
Analog-temperature sensor Connection: connect pin S to analog port A0, – to GND, and + to 5V
Relay Connection: connect pin S to digital pin 6, pin – to GND, and + to 5V
Rotary Encoder Connection: connect pin CLK to digital pin 2, DT to digital pin 3, SW to digital pin 4, pin – to GND, and + to 5V
Step 2: Program (Please refer to the example code in LEARN -> Get Tutorial on our website)
Step 3: Compile
Step 4: Upload the sketch to SunFounder Uno
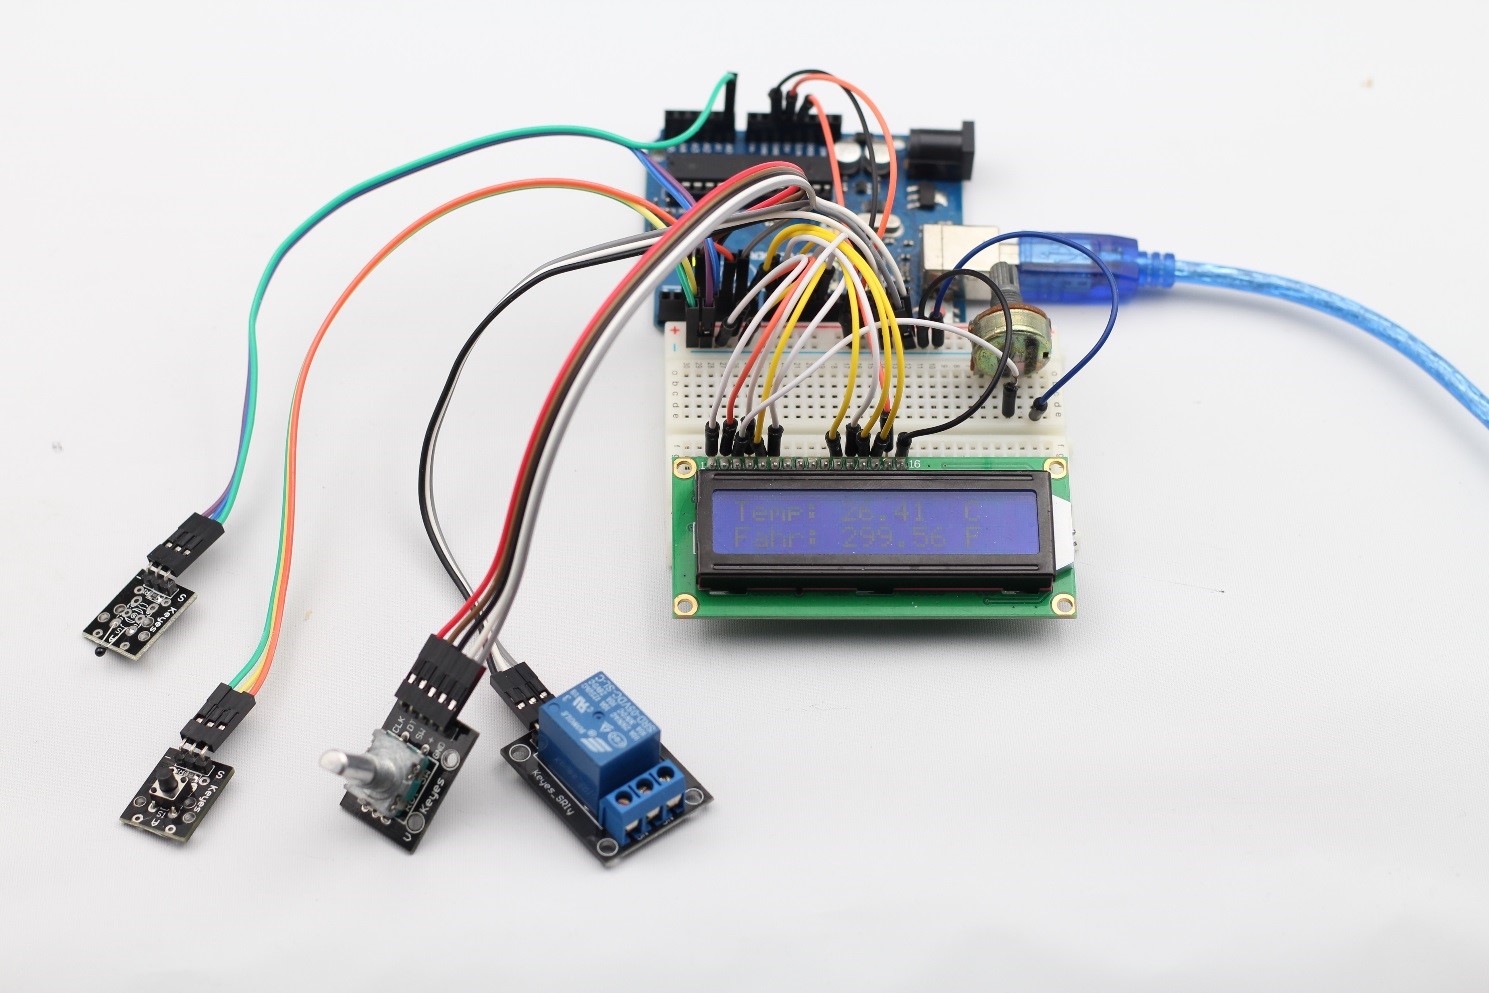
Now, after start up, you will see “Thermostatic Water Tank” displayed on the LCD1602, and then current temperature in both Celsius and Fahrenheit degrees. Press the button to setup.
Then spin the knob of the rotary encoder to change the temperature threshold. After setting is finished, for example, to 30℃, press the rotary encoder to confirm. Touch the thermistor and the value displayed on the LCD varies and finally the LED on the SunFounder Uno board will dim, for the measured temperature is higher than the threshold.
Code
| #include <LiquidCrystal.h> #include “encoder.h” #include <EEPROM.h> LiquidCrystal lcd(12, 11, 10, 9, 8, 7); ENCODER encoder; #define setKey 5 #define temPin A0 //the thermistor attach to #define relayPin 6 #define relayLed 13 float upperTem = 0.00; #define beta 4090 //the beta of the thermistor #define resistance 10 //the value of the pull-down resistor float hysteresis = 0.25; void setup() { pinMode(relayPin, OUTPUT); pinMode(relayLed, OUTPUT); digitalWrite(relayPin, HIGH); lcd.begin(16, 2); lcd.setCursor(0, 0); lcd.print(” Thermostatic “); lcd.setCursor(0, 1); lcd.print(” water tank “); encoder.Init(2, 3, 4); pinMode(setKey, INPUT); upperTem = EEPROM.read(0); delay(1000); }void loop() { if(digitalRead(setKey) == 0) { lcd.clear(); lcd.setCursor(0, 0); lcd.print(” Set Mode “); lcd.setCursor(0, 1); lcd.print(” start… “); delay(500); lcd.clear(); while(1) { lcd.setCursor(0, 0); lcd.print(“Adjust: “); float change = encoder.turnSettle(); upperTem = upperTem + change; lcd.print(upperTem); if(encoder.pressed()) { EEPROM.write(0, upperTem); delay(100); lcd.setCursor(0, 1); lcd.print(“Upper Tem: “); lcd.print((float) EEPROM.read(0)); delay(1000); lcd.clear(); break; } } } else { //read thermistor value long a = 1024 – analogRead(temPin); //the calculating formula of temperature float tempC = beta /(log((1025.0 * 10 / a – 10) / 10) + beta / 298.0) – 273.0; float tempF = tempC + 273.15; // Print a message of “Temp: “to the LCD. // set the cursor to column 0, line 0 lcd.setCursor(0, 0); lcd.print(“Temp: “); // Print a centigrade temperature to the LCD. lcd.print(tempC); // Print the unit of the centigrade temperature to the LCD. lcd.print(” C”); // set the cursor to column 0, line 1 // (note: line 1 is the second row, since counting begins with 0): lcd.setCursor(0, 1); lcd.print(“Fahr: “); // Print a Fahrenheit temperature to the LCD. lcd.print(tempF); // Print the unit of the Fahrenheit temperature to the LCD. lcd.print(” F”); delay(100); //wait for 100 milliseconds if(tempC > upperTem + hysteresis) { digitalWrite(relayPin, LOW); digitalWrite(relayLed, LOW); } else if(tempC <= upperTem – hysteresis) { digitalWrite(relayPin, HIGH); digitalWrite(relayLed, HIGH); } } } |