Introduction
In this lesson, we will try something interesting – gradually increase and decrease the luminance of an LED with PWM, just like breathing. So we give it a magical name – Breathing LED.
Components
– 1 * Raspberry Pi
– 1 * Breadboard
– 1 * LED
– 1 * Resistor (220Ω)
– Jumper wires
– 1 * T-Extension Board
– 1 * 40-Pin Cable
Principle
PWM
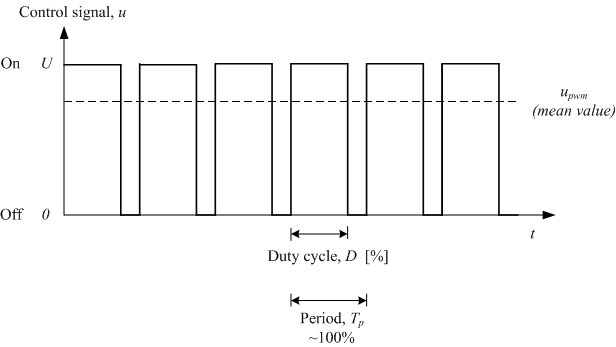
Pulse Width Modulation, or PWM, is a technique for getting analog results with digital means. Digital control is used to create a square wave, a signal switched between on and off. This on-off pattern can simulate voltages in between full on (3.3 Volts) and off (0 Volts) by changing the portion of the time the signal spends on versus the time that the signal spends off. The duration of “on time” is called pulse width. To get varying analog values, you change, or modulate, that width. If you repeat this on-off pattern fast enough with some device, an LED for example, the result would be like this: the signal is a steady voltage between 0 and 3.3v controlling the brightness of the LED.
Duty Cycle
A duty cycle is the percentage of one period in which a signal is active. A period is the time it takes for a signal to complete an on-and-off cycle. As a formula, a duty cycle may be expressed as:

Where is D the duty cycle, T is the time the signal is active, and P is the total period of the signal. Thus, a 60% duty cycle means the signal is on 60% of the time but off 40% of the time. The “on time” for a 60% duty cycle could be a fraction of a second, a day, or even a week, depending on the length of the period.
In this experiment, we use this technology to make the LED brighten and dim slowly so it looks like our breath.

Experimental Procedures
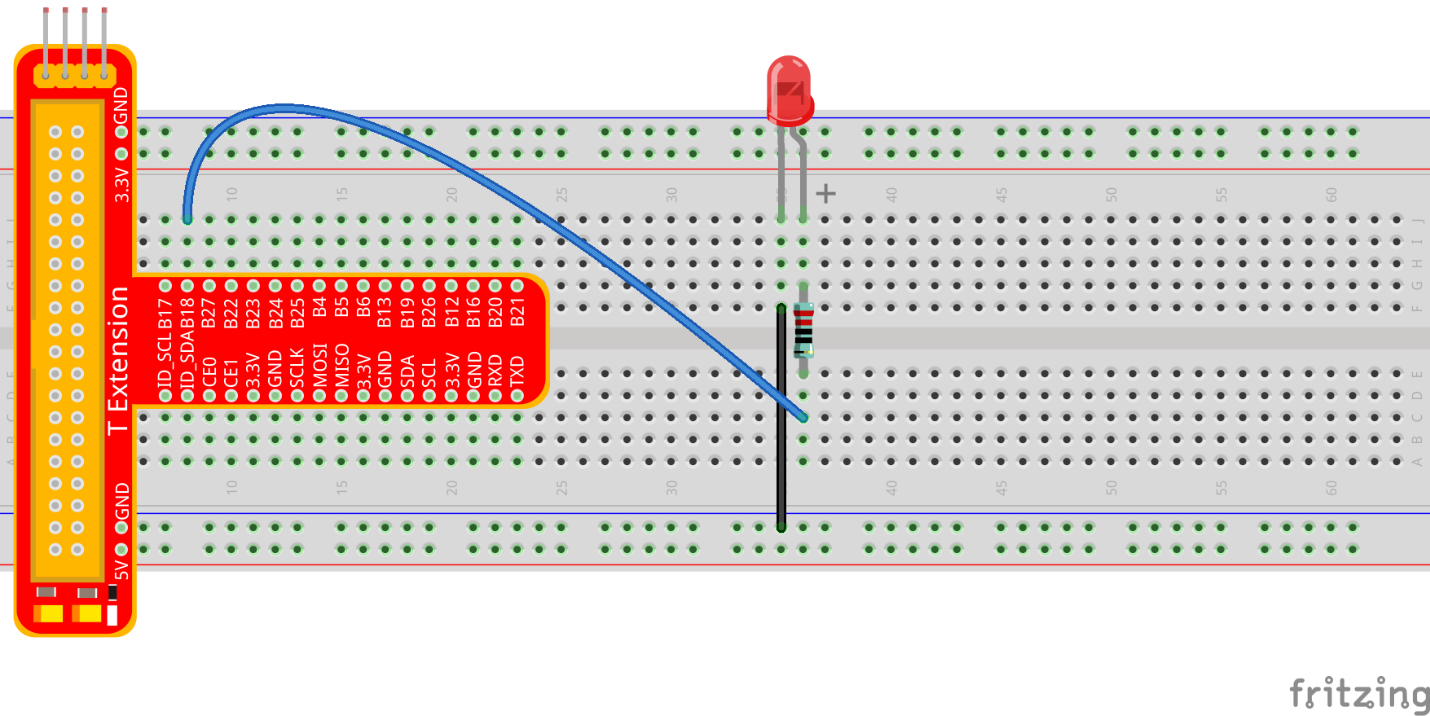
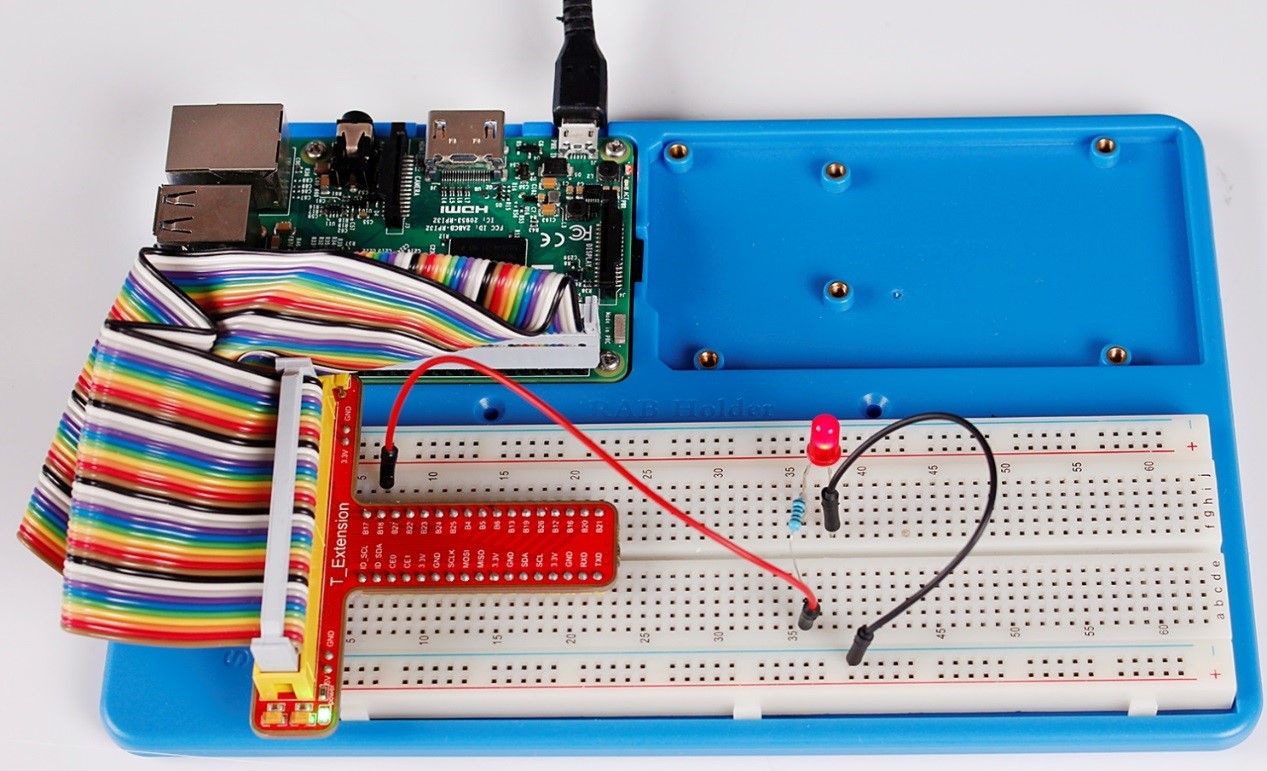
Step 1: Build the circuit
For C language users:
Step 2: Open the code file
cd /home/pi/SunFounder_Super_Kit_V3.0_for_Raspberry_Pi/C
Step 3: Compile the Code
make 04_breathLed
Step 4: Run the executable file above
sudo ./04_breathLed
For Python users:
Step 2: Open the code file
cd /home/pi/SunFounder_Super_Kit_V3.0_for_Raspberry_Pi/Python
Step 3: Run
sudo python 04_breathLed.py
Now you will see the gradual change of the LED luminance, between bright and dim.
Summary
Through this experiment, you should have mastered the principle of PWM and how to program Raspberry Pi with PWM. You can try to apply this technology to DC motor speed regulation later.
C Code
/**********************************************************************
* Filename    : breathLed.c
* Description : Make LED breath.
* Author      : Robot
* E-mail      : support@sunfounder.com
* website     : www.sunfounder.com
* Update      : Cavon    2016/07/01
**********************************************************************/

#include <wiringPi.h>
#include <stdio.h>

#define LedPin    1

int main(void)
{
	int i;

	if(wiringPiSetup() == -1){ //when initialize wiring failed, print messageto screen
		printf("setup wiringPi failed !");
		return 1;
	}

	pinMode(LedPin, PWM_OUTPUT);//pwm output mode

	printf("\n");
	printf("\n");
	printf("========================================\n");
	printf("|              Breath LED              |\n");
	printf("|    ------------------------------    |\n");
	printf("|         LED connect to GPIO0         |\n");
	printf("|                                      |\n");
	printf("|            Make LED breath           |\n");
	printf("|                                      |\n");
	printf("|                            SunFounder|\n");
	printf("========================================\n");
	printf("\n");
	printf("\n");

	while(1){
		printf("Breath on\n");
		for(i=0;i<1024;i++){
			pwmWrite(LedPin, i);
			delay(2);
		}
		delay(1000);
		printf("Breath off\n");
		for(i=1023;i>=0;i--){
			pwmWrite(LedPin, i);
			delay(2);
		}
	}

	return 0;
}
Python Code
#!/usr/bin/env python

import RPi.GPIO as GPIO
import time

# Set #17 as LED pin
LedPin = 18

def print_message():
	print ("========================================")
	print ("|              Breath LED              |")
	print ("|    ------------------------------    |")
	print ("|         LED connect to GPIO0         |")
	print ("|                                      |")
	print ("|            Make LED breath           |")
	print ("|                                      |")
	print ("|                            SunFounder|")
	print ("========================================\n")
	print 'Program is running...'
	print 'Please press Ctrl+C to end the program...'
	raw_input ("Press Enter to begin\n")

def setup():
	global pLed
	# Set the GPIO modes to BCM Numbering
	GPIO.setmode(GPIO.BCM)
	# Set LedPin's mode to output,
	# and initial level to low (0v)


	GPIO.setup(LedPin, GPIO.OUT, initial=GPIO.LOW)
	# Set pLed as pwm output and frequece to 1KHz
	pLed = GPIO.PWM(LedPin, 1000)
	# Set pLed begin with value 0
	pLed.start(0)

def main():
	print_message()
	# Set increase/decrease step
	step =2
	# Set delay time.
	delay = 0.05
	while True:
		# Increase duty cycle from 0 to 100
		for dc in range(0, 101, step):
			# Change duty cycle to dc
			pLed.ChangeDutyCycle(dc)
			print " ++ Duty cycle: %s"%dc
			time.sleep(delay)
		time.sleep(1)
		# decrease duty cycle from 100 to 0
		for dc in range(100, -1, -step):
			# Change duty cycle to dc
			pLed.ChangeDutyCycle(dc)
			print "  -- Duty cycle: %s"%dc
			time.sleep(delay)
		#time.sleep(1)

def destroy():
	# Stop pLed
	pLed.stop()
	# Turn off LED
	GPIO.output(LedPin, GPIO.HIGH)
	# Release resource
	GPIO.cleanup()

# If run this script directly, do:
if __name__ == '__main__':
	setup()
	try:
		main()
	# When 'Ctrl+C' is pressed, the child program
	# destroy() will be  executed.
	except KeyboardInterrupt:
		destroy()